Tesla Model X: Drive Unit - Rear - Small (Install)
Tesla Model X 2015-2024 Service Manual / Rear Drive Unit / Drive Unit - Rear - Small (Remove and Install) / Drive Unit - Rear - Small (Install)
Installation
Installation procedure is the reverse of removal, except for the following:Caution: Replace all Patchbolt(s).
Caution: Replace all nylon-insert locknuts.
Caution: Only fully tighten the suspension bushing bolts when the vehicle is in ride height position.
Caution: During reinstallation, carefully inspect the connector seals. If any are damaged, replace them.
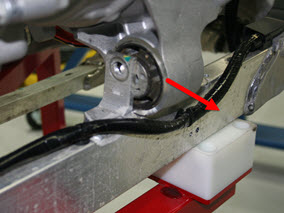
- When installing the halfshaft into the drive unit:
- Ensure that the opening of the snap ring is facing towards the bottom of the drive unit.
- Do not damage or displace the oil seal.
- Verify that the halfshaft is fully seated by carefully pushing it into the drive unit until there is an audible "click" from the snap ring.
- Apply P-80 emulsion to the connector seals on the HV cables
before securing the HV cables to the drive unit.
Caution: Do not apply P-80 emulsion to the HV terminals.
.png)
- When lowering the drive unit, do not align the rear mount on
the drive unit with the mounting hole in the subframe. Instead,
pull the rear mount beyond the rear subframe. This provides
enough clearance for the front of the drive unit to rotate into
position as the subframe is lowered.
- Secure the front and rear mount bolts, then secure the side mount bolt.
- If both the front and rear drive units were removed at the same time, the vacuum refill tool must be used to refill the cooling system (refer to procedure).
- Refill the gearbox with the recommended fluid. In this manual, refer to General Information > Capacities, Fluids, and Lubricants > Fluids.
- Perform a four wheel alignment (refer to procedure).
Drive Unit - Rear - Small (Remove and Replace)
Removal
Remove the small drive unit (refer to procedure).Installation
Installation procedure is the reverse of removal, except for the following:Perform a firmware update.