Tesla Model X: HV Battery Blanket (Remove and Replace)
Special tool required for this procedure:
| Supplier | Part Number | Description |
| Bosch | 223-MR05029-TSL | Ergonomic Silicone Seam Roller |
- Remove the HV battery (refer to procedure).
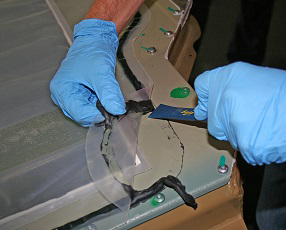
- Remove and discard the old top plastic cover by peeling the
plastic cover and butyl adhesive off from the top of the HV battery.
Caution: Do not attempt to reinstall the plastic cover once it has been removed from the vehicle; the plastic cover is unable to make a complete seal after it has been removed from a Battery.
Caution: Do not touch the sealing disks throughout this procedure; if the adhesive on the top of a sealing disc has been compromised, replace the sealing disk (refer to step 5).
Note: If necessary, carefully use a plastic scraper to assist with the removal of the butyl adhesive from the top of the HV battery.
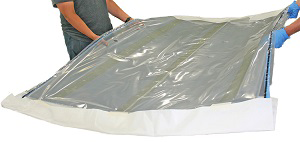
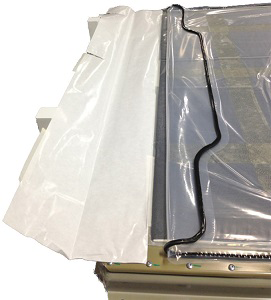
- Remove the battery blanket. Caution: If the HV battery blanket is going to be reused, 2 people must carry the blanket while transporting so that the ceramic sheet is not accidently damaged. Support the bottom of the HV battery blanket while transporting and store it on a flat surface.
- Clean the affected area of the HV battery cover thoroughly with alcohol wipes. Ensure that all of the adhesive has been removed. Caution: Do not use anything other than alcohol to clean the top of the HV battery.
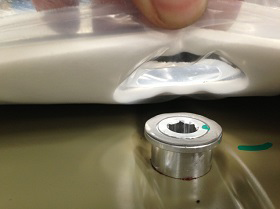
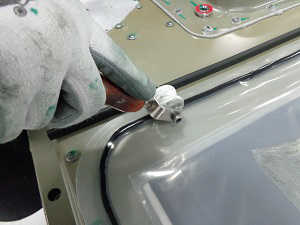
- Replace the sealing disks as necessary:
- Remove the sealing disk and all adhesive residue from the fastener with a plastic scraper or flathead screwdriver.
- Remove the backing from the new sealing disk and place the disk on the fastener.
- Press firmly onto the new sealing disk to ensure that it is firmly adhered to the fastener.
- Remove the red cover from the new sealing disk.
Caution: 2 people must carry the HV battery blanket while transporting so that the ceramic sheet is not accidently damaged. Do not carry the blanket from the top plastic cover; support the bottom of the HV battery blanket while transporting. Do not install a HV battery blanket that has a crack or tear in the ceramic sheet.
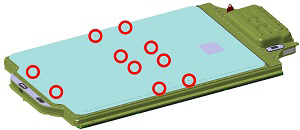
- Align the HV battery blanket with the top cover of the battery
so that the holes (x10) in the blanket line up with the sealing
disks (x10).
Note: Do not directly touch the sealing disks throughout this procedure.
- Visually inspect the battery blanket for damage, cracks, or torn plastic.
- If the battery blanket is being reused, place a new plastic cover on top of the blanket.
- Remove the tape from both sides of the plastic cover.
- Temporarily fold the front and rear portions of the plastic
cover over, then remove the tape and paper.
- Fold over the ends of the plastic cover so that the butyl adhesive can be adhered to the battery pack. Gently stretch the corners of the plastic cover and press onto the top of the HV battery cover.
Note: Ensure that the strips of adhesive do not block any of the fasteners and are not embedded in any of the gullies on top of the battery pack.
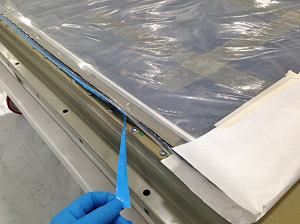
- Secure the plastic cover to the top of the battery pack by using
a silicone seam roller (TPN: 1049517-00-A).
Note: Apply pressure straight down onto the adhesive to avoid introducing air bubbles or wrinkling the plastic top.
- Ensure that the plastic cover is fully secured to the adhesive
on the top of the sealing disks (x10) by lightly pressing down on
the plastic cover over each sealing disk and applying moderate
pressure in a circular motion around the entire top of the sealing
disk.
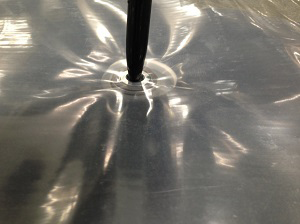
- Using a plastic pick or equivalent tool, pierce the plastic
cover over each of the sealing disks (x10) to allow for easier
installation of the HV battery.
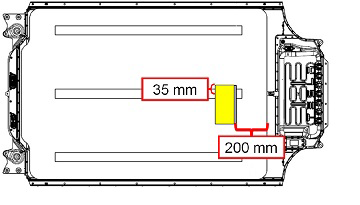
- Inspect the bottom right corner of the new Recycling Warning
Label. Ensure the part number is revision B or later.
Note: Do not install the Recycling Warning Label if it is revision A.
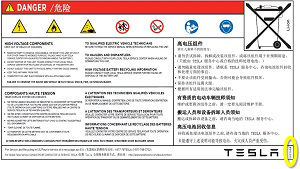
- Apply the Recycling Warning Label to the plastic cover so that
the left hand edge of the label is 35 mm from the center of the
battery pack and the top of the label is 200 mm from the front of
the blanket.
Note: The Recycling Warning Label must be placed in this approximate location for regulatory purposes; do not place the Recycling Warning Label on any other portion of the plastic cover.
- Reinstall the HV battery.