Tesla Model X: Air Spring Module - Front - RH (Remove and Replace)
Tesla Model X 2015-2026 Service Manual / Suspension / Air Spring Module - Front - RH (Remove and Replace)
Removal
- Place the vehicle on a lift, but do not raise the vehicle at this time.
- Activate Jack Mode on the touchscreen (refer to procedure).
- Connect a laptop with Toolbox to the vehicle.
- Use Toolbox to depressurize the front LH air spring module.
- Remove the cowl screen (refer to procedure).
- Disconnect 12V power (refer to procedure).
- Release the 3 nuts that secure the RH air spring to the body
(torque 39 Nm).
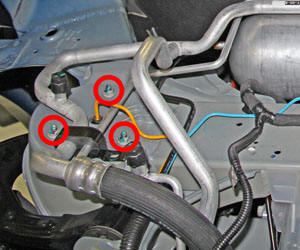
- Release the yellow air suspension line on the top of the air spring tower (torque 2 Nm).
- Loosen the front RH lug nuts.
- Raise the vehicle.
- Remove the front RH arch liner (refer to procedure).
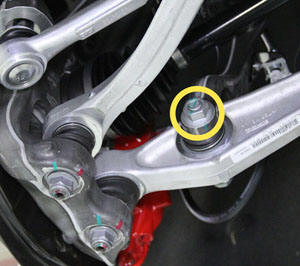
- Remove the bolt that secures the bottom of the air spring module
to the lower control arm (torque 140 Nm).
- Carefully remove the air spring from the vehicle.
Installation procedure is the reverse of removal, except for the following:
- Install the air spring into the vehicle.
- Lower the vehicle and install the 3 nuts to secure the air spring to the tower.
- Raise the vehicle and secure the air spring to the lower control arm.
- Reinstall all components that were removed for access.
- Use Toolbox to repressurize the RH air spring.
- Transfer the vehicle to a 4-post lift.
- Torque all suspension components while the vehicle is at ride height.