Tesla Model X: Bleed Procedure - System (Remove and Replace)
Bleed
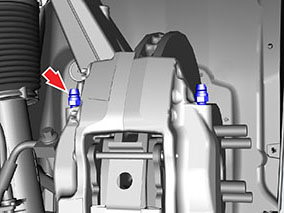
Note: The bleed procedure requires bleeding through the outboard bleed nipple of each caliper, bleeding through the inboard bleed nipple, then bleeding through the outboard bleed nipple again.
Note: A pressure bleeder is required to properly bleed the brake system. Do not use a vacuum bleeder.
- Position the vehicle on a lift but do not lift it at this time.
- If equipped, remove the lug nut covers.
- Initially loosen all lug nuts (x20) by hand (torque 175 Nm). Caution: Do not use an impact wrench to loosen the lug nuts.
- Disconnect 12V power (refer to procedure).
- Clean the area surrounding the brake fluid reservoir cap, then remove the cap. Note: Place suitable absorbent material around the affected area to absorb any possible fluid spillage. Caution: If brake fluid is spilled on a painted surface, wash off immediately with clean water.
- If the brake fluid is excessively dirty, use a syringe to remove the brake fluid from the reservoir.
- Top off the brake fluid reservoir. Warning: Use the brake fluid specified in this manual only (General Information > Fluids and Capacities > Fluids). Warning: Use only new brake fluid from a sealed container. Do not reuse brake fluid.
- Fill the pressure bleeder reservoir completely. Warning: Use the brake fluid specified in this manual only (General Information > Fluids and Capacities > Fluids). Warning: Use only new brake fluid from a sealed container. Do not reuse brake fluid. Note: This procedure requires a significant amount of fluid. Fill the pressure bleeder reservoir completely before continuing.
- Install the pressure bleeder on the reservoir.
- Set the pressure bleeder to 30 PSI (2.07 bar).
- Remove the road wheels (refer to procedure).
- Pressure bleed the left front caliper:
- Attach a brake bleed container to the outboard bleed nipple
on the caliper.
Note: Place suitable absorbent material around the affected area to absorb any possible fluid spillage.

- Loosen the bleed nipple one quarter turn counterclockwise.
- Tighten the bleed nipple once a flow of clean, air-free fluid is purged into the container (torque 18 Nm). Caution: If brake fluid is spilled on a painted surface, wash off immediately with clean water.
- Disconnect the bleed container and clean any brake fluid from the caliper.
- Repeat the pressure bleed procedure on the inboard bleed
nipple.
- Repeat the pressure bleed procedure on the outboard bleed
nipple a second time.
- Attach a brake bleed container to the outboard bleed nipple
on the caliper.
- Repeat step 12 on the right front caliper.
- Repeat step 12 on the right rear caliper.
- Repeat step 12 on the left rear caliper.
- Leave the pressure bleeder attached to the reservoir.
- Manually bleed the left front caliper:
- Attach a brake bleed container to the outboard bleed nipple
on the caliper.
Note: Place suitable absorbent material around the affected area to absorb any possible fluid spillage.
- Have an assistant press and hold the brake pedal. Note: Do not release the pedal until the bleed nipple is closed again.
- Loosen the bleed nipple one quarter turn counterclockwise.
- Tighten the bleed nipple (torque 18 Nm).
- Have the assistant release the pedal.
- Repeat steps 17b-17e 4 times.
- Disconnect the bleed container and clean any brake fluid from the caliper. Caution: If brake fluid is spilled on a painted surface, wash off immediately with clean water.
- Repeat the manual bleed procedure on the inboard bleed
nipple.
- Repeat the manual bleed procedure on the outboard bleed
nipple a second time.
- Attach a brake bleed container to the outboard bleed nipple
on the caliper.
- Repeat step 17 on the right front caliper.
- Repeat step 17 on the right rear caliper.
- Repeat step 17 on the left rear caliper.
- Lower the vehicle.
- Remove the pressure bleeder in accordance with the manufacturer's instructions. Caution: If brake fluid is spilled on a painted surface, wash off immediately with clean water.
- Check the brake fluid level, and top off the fluid if required.
- Install the brake fluid reservoir cap.
- Reconnect 12V power.
- Reinstall the road wheels.
- Sit in the driver's seat and pump the brake pedal several times. Check for a short, firm travel when the brakes are applied. If the brake pedal feel is not firm, refill the bleeder tank, then repeat the bleed procedure.
- Reinstall all components that were removed for access.
- Perform a road test using a series of ABS-active stops and ensure proper brake pedal feel and performance. If the brake pedal feel is not firm, refill the bleeder tank, then repeat the bleed procedure.