Tesla Model X: Curtain Air Bag - 2nd Row - LH (Remove and Replace)
Removal
- Open both rear doors.
- Remove the rear door trim panel (refer to procedure).
- Disconnect 12V power (refer to procedure).
- Ensure that the first responder loop has been disconnected for at least 2 minutes.
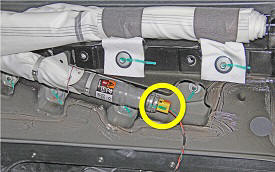
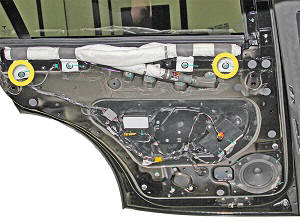
- Disconnect the electrical connector from the front of the
curtain air bag.
Warning: To avoid personal injury, observe all relevant safety precautions before removing or testing any SRS components.
Warning: To avoid personal injury, eye protection must be worn when performing this operation.
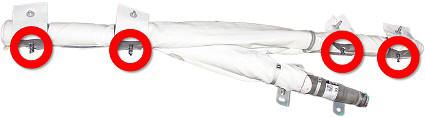
- Remove and discard the bolts (x6) that secure the curtain air
bag to the door. Remove the metal plate.
Note: Components have been removed in this graphic to aid clarity.

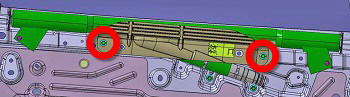
- Lift the curtain air bag straight up to release the fir tree clips (x4) from the door.
Note: Components have been removed
in this graphic to aid clarity.
- Remove the curtain air bag from the vehicle.
Warning: Store the air bag module with the deployment side facing up. This will prevent it from being propelled if accidentally deployed, which might cause injury.
InstallationInstallation procedure is the reverse of removal, except for the following:
Caution: Replace any broken clips.
Caution: Replace all Patchbolt(s). Install the rear curtain air bag in the following order:
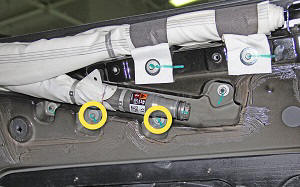
- Install the bolts (x2) that secure the inflator
bracket to the door (torque 7 Nm).
- Install the fir tree clips (x4) that secure the
curtain air bag into the door.
Note: Components have been removed in this graphic to aid clarity.
- Install the bolts (x2) that secure the metal plate
(torque 7 Nm).
Caution: Ensure that the air bag is not twisted; it must be straight from the front to the rear.
Caution: Ensure that the tabs under the metal plate are not twisted.
- Install the outermost bolts (x2) that secure the
curtain air bag to the door (torque 7 Nm).
Caution: Ensure that the fabric tabs are not twisted.
- Connect the electrical connector at the front of the
curtain air bag.