Tesla Model X: HV Battery Assembly (Remove and Install)
Warning: Only technicians who have been trained in High Voltage Awareness are permitted to perform this procedure. Proper personal protective equipment (PPE) and insulating HV gloves with a minimum rating of class 00 (500V) must be worn any time a high voltage cable is handled. Refer to Tech Note TN-15-92-003, "High Voltage Awareness Care Points" for additional safety information.
Warning: If the vehicle has air suspension, activate "Jack" mode on the touchscreen before raising and supporting the vehicle.
Caution: Do not use an impact wrench to remove battery fasteners.
Note: Use a cordless electric drill with a 3/8 in drive adapter and an 3/8 in drive air ratchet wrench to perform this procedure. Do not use an impact wrench to remove battery fasteners. Note: This procedure is intended to be performed by 2 technicians.
Special tools required for this procedure:
| Supplier | Part Number | Description |
| Tesla | 1020566-00-E | BATT MAN LIFT TABLE - MDLS |
| Tesla | 1026526-00-C | HV Battery Alignment Rods |
| Tesla | 1038478-00-A | ASY,COVER,HV RAPID,HVBAT,MDLS |
| Tesla | 1028325-00-A | ASY,COVER,LV RAPID,HVBAT,MDLS |
Removal
- Disconnect 12V power (refer to procedure).
- Remove the mid aero shield (refer to procedure).
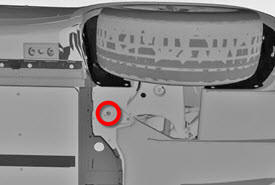
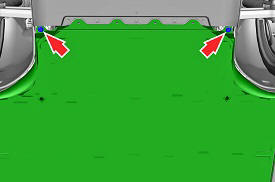
- On both sides of the vehicle, remove the nut that secures the
shear plate to the subframe (torque 35 Nm).
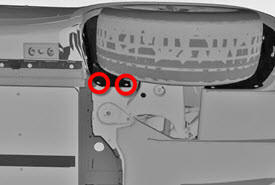
- On both sides of the vehicle, remove the push clips (x2) that
secure the rear wheel arch liner to the shear plate.
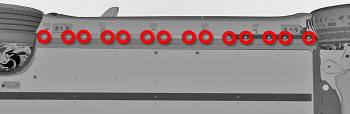
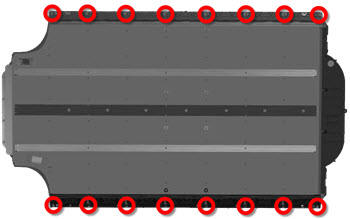
- On both sides of the vehicle, remove the push clips (x14) that
secure the HV battery side ski covers (x3).
Note: The front and rear side ski covers overlap the middle side ski cover. Note the "END" and arrow markings on the side ski covers.
Note: Do not remove the bolts that secure the HV battery to the body rocker panel yet.
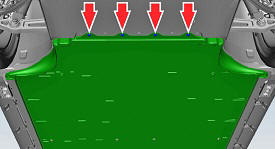
- Remove the central bolts (x12) that secure the battery to the
body (torque 38 Nm).

- Remove the bash plate extrusion (refer to procedure).
- Remove the bolts (x4) that secure the HV battery to the front
subframe (torque 30 Nm).
- Remove the bolts (x2) that secure the HV battery to the front
subframe and body (torque 115 Nm).
- Position the battery table underneath the battery. Ensure that the table is level and can support the full weight of the battery.
- Carefully lower the vehicle onto the battery table until the weight of the HV battery is fully supported by the battery table.
- Remove the bolts (x16) that secure the HV battery to the body
(torque 55 Nm).
- Slowly lift the vehicle until the HV battery is clear of the underbody.
- Move the battery table away from the vehicle lift.
- Use a multimeter to check voltages at the HV battery:
- B+ to ground
- B- to ground
- B+ to B-
- Insert a high voltage cover and a low voltage cover into the
high and low voltage battery ports. If covers are not available, use
3M 2480S Masking Tape (2 in. wide) or 3M 471 Red Vinyl Tape (2 in.
wide) to seal the ports.
Caution: Verify the seals on the covers are
undamaged before use.
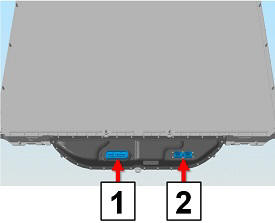
1 High voltage port 2 Low voltage port
Installation procedure is the reverse of removal, except for the following:
Caution: Replace all nylon-insert locknuts.
Caution: All fasteners that secure the HV Battery (whether patched or not) are one-time use only. Replace all fasteners.
Caution: Do not use an impact wrench to install battery fasteners.
- Raise the battery into position and use the alignment pins (x2) to ensure that the Rapid Splitter and logic connector properly connect to the battery. Note: Use the HV battery alignment rods to assist in alignment.
- Ensure that the Rapid Splitter is properly seated.
- Check and top up cooling system (refer to procedure).
HV Battery Assembly (Remove and Replace)
RemovalRemove the HV battery (refer to procedure).
Installation
Installation procedure is the reverse of removal, except for the following: Tip: Tesla recommends pre-filling new batteries with coolant before they are installed .
- If the battery was not pre-filled with coolant, the vacuum refill tool must be used to refill the cooling system (refer to procedure).
- Use Toolbox to update or redeploy the firmware.