Tesla Model X: Liftgate Glass (Remove and Replace)
Remove
- Open all 4 windows. This prevents internal pressure from pushing out on the liftgate glass when it is installed.
- Open the LH and RH rear doors.
- Remove the active spoiler assembly (refer to procedure).
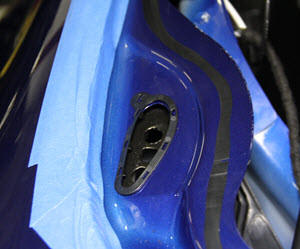
- Apply painter's tape to the panels that are adjacent to the liftgate glass.
- Vehicles with power liftgate only:
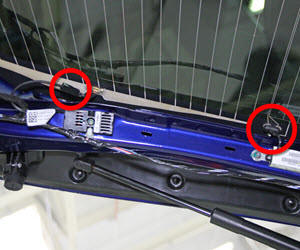
- Disconnect the electrical harnesses for the LH, RH, and upper pinch sensors.
- Remove the fasteners that secure the LH and RH pinch sensors to the liftgate, then remove the LH and RH pinch sensors.
- Remove the upper pinch sensor.
- Disconnect the harnesses that attach to the glass on the LH and
RH sides of the liftgate. Tape the harnesses to the liftgate so that
they are out of the way when the glass is removed in a later step.
- Remove the upper liftgate glass seal.
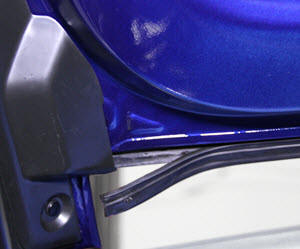
- Use a glass-cutting blade to cut the LH and RH locator posts.
Tip: Move the tool around to feel for the locations of the locator posts.
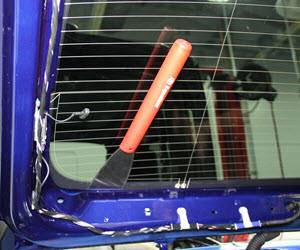
- Cut an appropriate length of square wire and insert the wire into the square wire cutting tool.
- Push the tool through the adhesive near the upper LH or RH
corner. Pull the wire through and remove the tool.
- Connect the T-handles to the wire. Note: Use an assistant for the remainder of the removal steps to make removal easier.
- Cut out the liftgate glass. Use a flat tool to guide the wire around the locator post near the top of the glass.
Warning: To avoid personal injury, eye protection must be worn when performing this operation.
Caution: Take care not to damage component(s).
Installation- Check the LH and RH active spoiler lip seals for damage, and
replace if necessary.
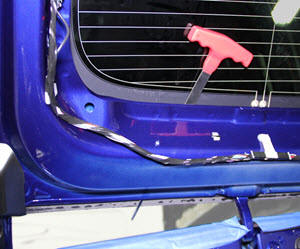
- Use the adhesive scraper to remove the excess adhesive from the liftgate.
- Clean the remaining adhesive on the liftgate with alcohol wipes. Allow the alcohol to dry fully before continuing to the next step.
- Apply primer to the liftgate as directed by the adhesive manufacturer. Ensure that the primer fully covers any nicks or scratches in the paint.
Warning: Check the expiration date of the primer and adhesive before use.
Note: Check the primer and adhesive packaging for the appropriate working times for each product. Prepare the necessary tools and work environment so that the the glass can be installed within the specified working times.
Note: This procedure requires approximately 2 tubes of adhesive.
- Clean the etched area of the glass with alcohol wipes. Allow the alcohol to dry fully before continuing to the next step.
- Apply primer to the etched area of the glass as directed by the adhesive manufacturer.
Note: Check the primer packaging for the appropriate wait time before applying adhesive.
- Cut the applicator tip on the adhesive tube in a triangular pattern: 8 mm wide, 14 mm tall.
- Apply the adhesive to the etched area of the liftgate glass.
- Install the rear liftgate glass, starting from the top.
- Ensure that the gaps between the glass and the liftgate are even front to back and side to side. Evenly and progressively press the glass onto the spacers.
- Clean off any excess adhesive that was extruded from the joint.
Warning: Do not drive the vehicle until the adhesive has cured. Refer to the adhesive packaging for the safe drive-away time.
- Reconnect all harness connections.
- Have an assistant use a hose to spray water along the edges of the liftgate glass. Ensure that no water leaks into the interior.
- Reinstall all components that were removed for access.