Tesla Model X: Link - Lower - Aft - LH (Remove and Replace)
Tesla Model X 2015-2026 Service Manual / Suspension / Link - Lower - Aft - LH (Remove and Replace)
Warning: If the vehicle has air suspension, activate "Jack" mode on the touchscreen before raising and supporting the vehicle. Removal
- Loosen the front LH lug nuts (x5) (torque 175 Nm).
- Raise and support the vehicle (refer to procedure). Warning: Do not work on an incorrectly supported vehicle.
- If the vehicle is equipped with air suspension, depressurize the air spring (refer to procedure).
- Remove the HV Battery (refer to procedure).
- Remove the road wheel (refer to procedure).
- Remove the bolt and nut that secure the front air spring module to the rear lower control arm (torque 140 Nm).
- Compress the spring module and release it from the lower arm.
- Remove and discard the nut that secures the rear lower control
arm to the knuckle (torque 195 Nm).
Caution: To prevent ball joint damage, always hold the ball joint pin with a wrench while loosening or tightening the lock nut.
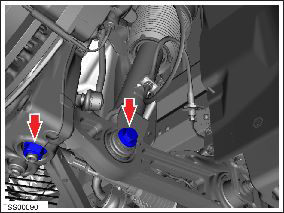
- Mark a witness line on the subframe cam to aid installation.
- Remove the bolt and nut that secure the rear lower control arm
to the subframe (torque 130 Nm).
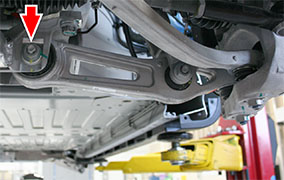
- Release the rear lower control arm from the subframe.
- Release the ball joint from the knuckle.
- Remove the rear lower control arm from the vehicle.
Installation procedure is the reverse of removal, except for the following:
Caution: Replace all nylon-insert locknuts.
Caution: Only fully tighten suspension nuts and bolts when the vehicle is on a 4-post lift and the suspension is in the ride height position.
Note: Clean the affected areas before installation.
- Install the cam bolt to the previously marked position. Do not fully tighten the nut at this time. Warning: Install the bolt from the rear. The nut should be attached from the front side of the control arm.
- Transfer the vehicle to a 4 post lift (refer to procedure).
- Pressurize the air spring, if the vehicle has air suspension (refer to procedure).
- Perform a four wheel alignment check (refer to procedure).