Tesla Model X: Switch - Hazard Warning (Remove and Replace)
Removal
Remove the MCU/touch screen
(refer to procedure).
Remove the screws (x2) that secure the hazard
warning switch to the touch screen surround (torque 1 Nm).
Note: Components
have been removed in this graphic to aid clarity.
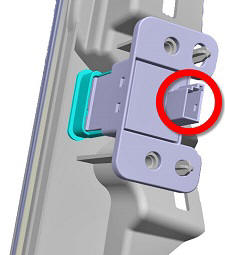
Disconnect the electrical connector from the
hazard warning switch.
Note: Components
have been removed in this graphic to aid clarity.
Remove the hazard warning switch from the touch
screen surround.
Installation
Installation procedure is the reverse
of removal.
READ NEXT:
Remove
Remove the headlamp
(refer to procedure).
Caution: Note the routing of
the harness through the headlamp bracket. Ensure that is routed
correctly dur
Removal
Remove the headlamp assembly
(refer to procedure).
Remove the screws (x3) that secure the inner
bracket to the headlamp (torque 1.0 Nm).
Removal
Remove the headlamp assembly
(refer to procedure).
Remove the screw that secures the outer bracket
to the headlamp (torque 1.0 Nm).
SEE MORE:
Note: Loosen suspension fasteners by hand, then use a
cordless electric drill with a 3/8 in drive adapter and an 3/8
in drive air ratchet wrench.
Removal
Remove the drive unit (refer to procedure).
Installation
Note: Perform the Installation section of
40010701, "Dri
Removal
Open the LH front door.
Open the LH 2nd row door.
Raise the LH front window approximately 3/4 of the way up.
Disconnect 12V power (refer to procedure).
Remove the lower A-pillar trim panel (refer to procedure).
Fold back the footwell carpet, then disconnect the d
.jpg)