Tesla Model X: Tire - Front - LH
Tesla Model X 2015-2026 Service Manual / Wheels and Tires / Tire - Front - LH
Warning: Always read and understand the tire equipment operator's manual before operating the wheel balancer or tire changer.
Note: These instructions are based on the Hunter TC3900 tire changer. Some steps might be different for other tire changers. Refer to the operator's manual for specific information.
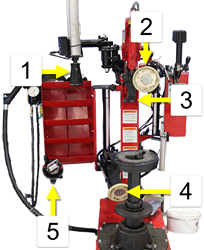
| 1 | Bead press arm |
| 2 | Upper bead roller |
| 3 | Mount head |
| 4 | Lower bead roller |
| 5 | Center clamp and cone |
- Remove the front road wheel (refer to procedure).
- Place the wheel on the tire changer, with the front of the wheel facing up.
- Insert the center clamp.
- Tighten the cone on the center clamp.
- Remove the valve core.
- Position the upper bead roller at the edge of the rim.
- Rotate the tire to loosen the upper bead. Lubricate the bead as the tire rotates. Caution: The TPMS sensor is close to the rim. Do not damage the TPMS sensor when loosening the upper bead.
- Position the lower bead roller at the edge of the rim.
- Rotate the tire to loosen the lower bead. Lubricate the bead as the tire rotates.
- Position the mount head at the edge of the rim, then lift the mount head to hook the upper bead.
- Rotate the tire to pull the upper bead above the rim. Lubricate the bead as the tire rotates.
- Use the lower bead roller to lift the tire off of the rim.
- Thoroughly lubricate both beads.
- If the tire has "outside", "side facing outwards", or a direction of rotation arrow on the sidewall, ensure that the tire is oriented properly.
- Push the lower bead of the tire over the rim by hand.
- Position the mount head on the upper bead.
- Use the bead press arm to push down on the sidewall.
- Slowly rotate the tire to push the upper bead below the rim.
- Attach the air chuck to the valve stem.
- Use the foot pedal to inflate the tire to approximately 40 PSI (275 kPa). Warning: The pressure gauge shows accurate pressure when the pedal is released. Repeatedly press and release the pedal to avoid overinflation. Warning: Do not exceed the pressure indicated on the tire sidewall.
- Have the valve stem removal tool ready for the next step.
- Remove the air check from the valve stem, then install the valve core.
- Balance the tire (refer to procedure).
- Record the road force on the Repair Order.
Note: If installing multiple tires, record the road force for each tire on the Repair Order.