Tesla Model X: Tire - Front - LH - Repair
Warning: To avoid personal injury, eye protection must be worn when performing this operation.
Warning: To avoid personal injury, wear cut-resistant gloves when performing this operation.
Warning: Always read and understand the tire equipment operator's manual and on-screen instructions before operating the wheel balancer or tire changer.
Warning: Only use cleaning agents and solvents in a well-ventilated area.
Special tool(s) required for this procedure:
| Supplier | Part Number | Description |
| 1081319-00-A | Hoe style inner liner scraper | |
| 1081320-00-A | Air tool 2500 RPM buffer with quick change chuck | |
| 1081322-00-A | 2 1/2" light duty carbide buffing wheel | |
| 1081321-00-A | Buffer exhaust hose kit | |
| 1081323-00-A | 7/32" carbide cutter | |
| 1081325-00-A | 3/16" x 1 1/2" wood handle ball bearing stitcher | |
| 1081326-00-A | Manual tire spreader |
- Visually inspect the tire. If any of the following are noted,
discontinue this procedure and replace the tire:
- The puncture is on the shoulder or sidewall
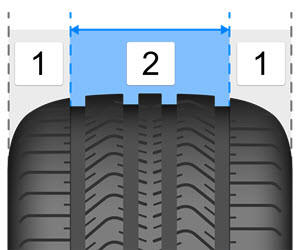
1 Non-repairable areas 2 Repairable area - The foreign object entered the tire at an angle of more
than 15 degrees from perpendicular to the tread surface
- The foreign object is more than 1/4 in (6.3 mm) in diameter
- The tread depth is less than 2/32 in (1.6 mm)
- There is oxidation or weather cracking on the sidewall that is deeper than 2/32 in (1.6 mm)
- The tire is more than 10 years old
- The puncture is on the shoulder or sidewall
- Dismount the tire from the wheel (refer to procedure).
- Place the tire on the tire spreader, with the puncture facing down.
- Spread the sidewalls to create a larger working area.
- Visually inspect the entire inside of the tire. If any of the following
are noted, discontinue this procedure and replace the tire:
- Evidence of the tire being driven while flat (inner sidewall cracking, separated, or blue in color)
- A previous repair is close enough to the new puncture that the repair areas will overlap
- Previous improper repairs
- Broken, kinked, or damaged beads
- Any other internal damage
- The foreign object is more than 1/4 in (6.3 mm) in diameter
- If the vehicle was outdoors in temperatures below 50 degrees F (10 degrees C), use a heat gun or other heat source to thoroughly warm the tire.
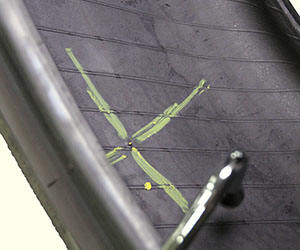
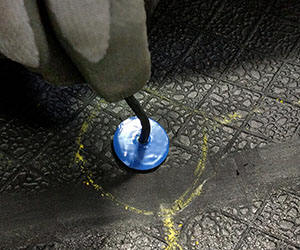
- Use the paint stick to mark the area around the puncture on the inside
and outside of the tire.
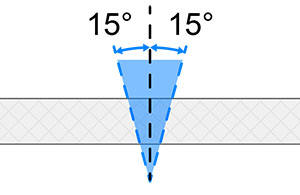
- Confirm the path of the foreign object (the puncture channel). The
puncture channel must be no more than 15 degrees from perpendicular to the
tread surface. If the puncture channel is more than 15 degrees, discontinue
this procedure and replace the tire.
- Remove the foreign object from the tire.
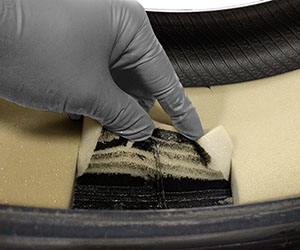
- If the tire has an interior foam noise absorber:
- Cut out a section of foam around the marked area, 50 mm from each side of the puncture. Caution: Take care not to damage component(s).
- Remove and discard the foam section.
- Use the carbide cutter to clear the puncture channel. Warning: Use a low speed (under 1200 RPM) only. Excessive speed damages the rubber surrounding the puncture channel, increasing the chances of future leakage.
- Hold the Minicombi insert over the puncture channel. Use the paint stick
to draw an outline that is approximately 15 mm larger than the diameter of
the Minicombi insert.
- Remove the Minicombi insert.
- Apply pre-buff cleaner to the outlined area. Wait at least 5 seconds before continuing to the next step.
- Use the inner liner scraper to scrape the outlined area.
- Repeat the previous 2 steps until the outlined area is fully cleaned.
- Use the buffer to lightly buff the outlined area until it is smooth. Caution: Do not remove too much rubber. If the cords are exposed, the tire must be replaced.
- Vacuum the debris from the inside of the tire. Warning: To avoid contamination, do not let the vacuum nozzle touch the buffed area. Contamination prevents the Minicombi insert from adhering properly, which can result in tire failure, leading to serious injury or death. Warning: Do not use compressed air to clean the buffed area. Compressed air contains moisture and oil that prevent the Minicombi insert from adhering properly, which can result in tire failure, leading to serious injury or death.
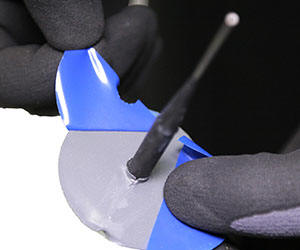
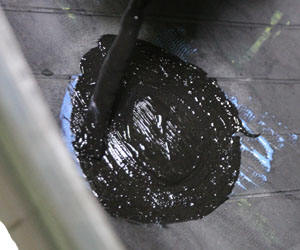
- Apply a thin, even layer of blue cement to the outlined area.
- Allow the cement to dry for at least 5 minutes, then test it by touching with a clean finger or knuckle. The cement is dry if it feels tacky. Wait until the cement dries before continuing to the next step. Warning: Allow the cement to dry naturally. Do not use compressed air, a fan, a heat gun, or other artificial means to force the cement to dry faster. Doing so prevents the Minicombi insert from adhering properly, which can result in tire failure, leading to serious injury or death. Tip: The cement dries faster if the tire is rotated so that the repair area is at the highest point of the tire.
- Rotate the tire so that the repair area is in a comfortable working location. Ensure that the sidewalls are not spread. Warning: The tire must be relaxed (sidewalls not spread) before continuing. If the sidewalls are spread, the Minicombi insert does not adhere properly, which can result in tire failure, leading to serious injury or death.
- Apply a small amount of blue cement to the puncture channel.
- Remove the Minicombi insert from the protective cover.
- Install the Minicombi insert:
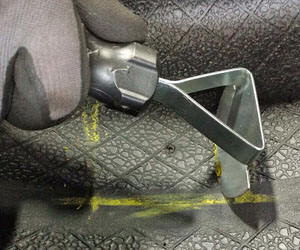
- Insert the guide pin and stem from the inside of the tire.
- Use pliers to pull the guide pin from the outside of the tire until the rubber stem is visible.
- Use pliers to pull the rubber stem until the base of the
Minicombi insert is flush with the tire and has a slight
dimple.
Note: The guide pin is not designed to pull the Minicombi insert through the tire.
- Roll the stitcher over the base of the Minicombi insert to fully adhere
it to the tire. Start from the center of the base and roll toward the
outside. Ensure that the whole base is thoroughly adhered to the tire.

- Remove the protective cover from the base of the Minicombi insert.
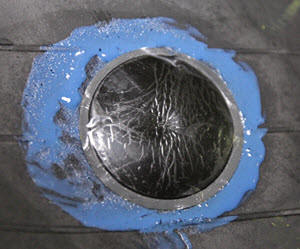
- Apply a generous amount of repair sealant to the base of the Minicombi
insert and the buffed area.
- Mount the tire on the wheel (refer to procedure). Check for leakage.
- Cut off the exposed stem of the Minicombi insert so that the stem is flush with the tire tread.
- Rebalance the tire (refer to procedure).
Tire Rotation
- Remove all 4 wheels (refer to procedure).
- Reinstall the wheels according to the correct rotation pattern for the type of tire (refer to General Information > Best Practices > Wheels and Tires).