Tesla Model X: Steering Column (Remove and Replace)
Tesla Model X 2015-2026 Service Manual / Steering / Steering Column (Remove and Replace)
Removal
- Remove the steering column control module (refer to procedure).
- Remove the screws (x2) that secure the driver's knee bolster
(torque 2.3 Nm). Remove the bolster from the vehicle.
.jpg)
- Remove the LH center console closeout extension (refer to procedure).
- Remove the LH footwell assembly cover (refer to procedure).
- Remove the driver's knee air bag (refer to procedure).
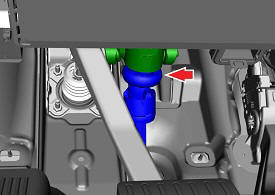
- Mark the lower shaft position relative to the column.
- Remove the bolt that secures the lower shaft to the steering
column (torque 30 Nm).
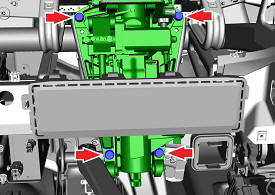
- Remove the fasteners that secure the steering column to the
mounting bracket (upper nuts 30 Nm, lower bolts 17 Nm).
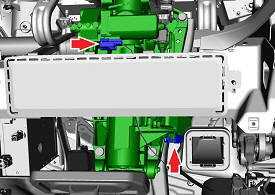
- Disconnect the steering column motor harness connectors (x2).
Caution: Take care not to damage component(s).
- Release the steering column from the lower shaft and remove the steering column from the vehicle.
Installation procedure is the reverse of removal, except for the following:
Caution: Replace all nylon-insert locknuts.
Caution: Replace all Patchbolt(s).
Note: Clean the affected areas before installation.
- Ensure that the lower shaft to column marking aligns correctly.
- Use Toolbox to reflash the steering module:
- Connect a laptop with Toolbox 2.0 or later to the vehicle.
- In Toolbox, select Panels > Steering > Power Steering (EPAS) Control.
- Follow the onscreen instructions to reset the power steering calibration. Note: After recalibrating the power steering, drive the vehicle for a minimum of 5 minutes before returning the vehicle to the customer.