Tesla Model X: Vertical Alignment
Tesla Model X 2015-2024 Service Manual / Electrical / Calibration - Front Radar Sensor / Vertical Alignment
Special tools required for this procedure:
| Part Number | Description |
| 1056984-00-A | Radar calibration bubble level |
| 1071267-00-A | Radar adjustment screwdriver |
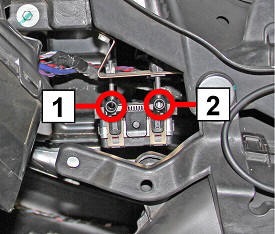
| 1 | Horizontal alignment screw |
| 2 | Vertical alignment screw |
- Inspect the bubble tool for damage. Caution: Do not perform this procedure with a damaged bubble tool.
- Remove the front fascia assembly (refer to procedure).
- Perform a four wheel alignment (refer to procedure). Note: The vehicle must be level when performing the vertical alignment procedure. Do not remove the vehicle from the alignment rack.
- Clean the front of the radar sensor with water and a clean shop towel.
-
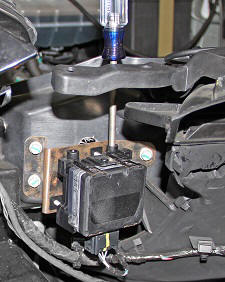
Use the bubble tool to adjust the vertical
alignment of the radar sensor:
-
Gently support the bubble tool flat against
the upper center portion of the radar sensor face.
Caution: Do
not apply excessive pressure to the bubble tool; the
radar sensor might become misaligned.
-
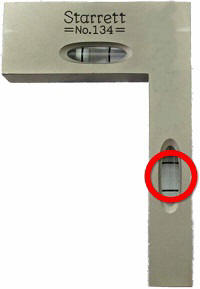
Check the bubble on the long portion of the
bubble tool. The radar sensor is calibrated vertically if the
bubble is centered between the black lines.
Caution: The bubble must be centered between the 2 black lines to achieve the required calibration.
Tip: It might be easier to see the bubble with a flashlight.
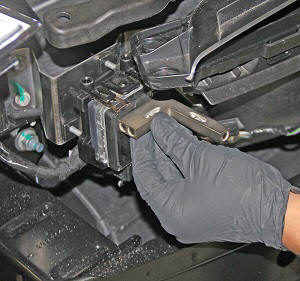
-
If necessary, adjust the vertical set
screw.
Note: Components have been removed in this graphic to aid clarity.
- Perform steps b and c as necessary until the radar sensor is calibrated vertically.
Caution: Remove the adjustment screwdriver from the vertical set screw while measuring with the bubble tool to avoid misaligning the radar sensor.
-
Gently support the bubble tool flat against
the upper center portion of the radar sensor face.
Caution: Do
not apply excessive pressure to the bubble tool; the
radar sensor might become misaligned.
- Remove the vehicle from the alignment rack.
- Reinstall the front fascia assembly.
- Perform the "Horizontal Alignment" procedure.