Tesla Model X: Charger (Remove)
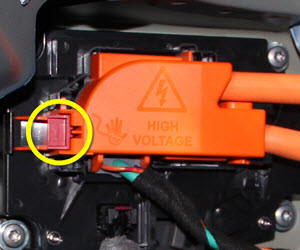
Warning: Only technicians who have been trained in High Voltage Awareness are permitted to perform this procedure. Proper personal protective equipment (PPE) and insulating HV gloves with a minimum rating of class 00 (500V) must be worn any time a high voltage cable is handled. Refer to Tech Note TN-15-92-003, "High Voltage Awareness Care Points" for additional safety information.
Special tool required for this procedure (North America and Japan):
| Supplier | Part Number | Description |
| Tesla | 1020288-00-A | TOOL,INSTALLATION,EV INLET,MDLS |
Tip: It is helpful, but not necessary, to have the vehicle on a lift while performing this procedure.
- Open both rear doors.
- Open the liftgate.
- Open the charge port.
- Perform the electrical isolation procedure (refer to procedure).
- Remove the LH parcel shelf support (refer to procedure).
- Remove the bolts that secure the LH tiedown bracket, then remove
the bracket (torque 9 Nm).
.
- Remove the rear fascia (refer to procedure).
- Pull inboard on the tab on the rear of the charge port cover,
then rotate the rear of the cover toward the front of the vehicle to
remove it from the charge port.
.
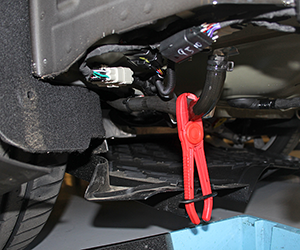
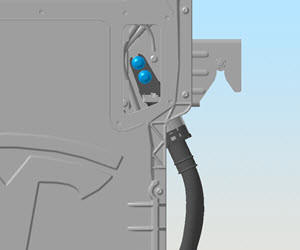
- Release the bolts that secure the HV cables to the charge port
(torque 9 Nm).
.
- If equipped, disconnect the rear PTC heater harness from the
charger.
.
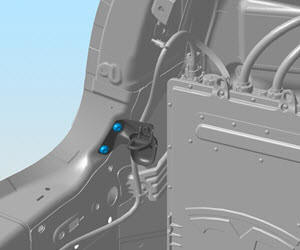
- Remove the nut and release the ground strap from the stud on the
D-pillar (torque 9 Nm).
.

- Remove the bolt and release the green charge port ground cable
from the charger (torque 6 Nm).
.

- Working under the vehicle, clamp the lower coolant hose.
.
- Disconnect the electrical connector from the bottom of the charger. Move the harness out of the work area.
- Remove the nuts that secure the charger to the body (torque 9 Nm).
- Position a container in order to catch spilled coolant.
- Release the coolant hose from the bottom of the charger.
- Release the barrel clip that holds the upper coolant hose to the body.
- Clamp the upper coolant hose.
.
- Release the hose from the charger, then plug the hose.
- Move the hose out of the work area.
- Remove the nuts that secure the charger bracket to the body
(torque 7 Nm).
.

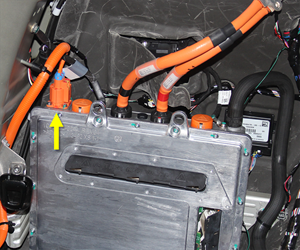
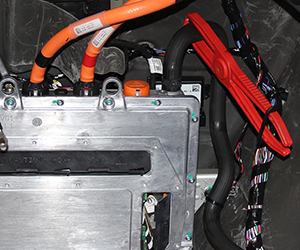
- Release the forward HV cable grommet from the body. This reduces
tension on the forward HV cables, allowing easier access to the back
of the charger.
.
- Rock the charger left and right, then pull it up partially and tilt it toward the center of the vehicle.
- Remove the bolts that secure the bracket to back of the charger.
.
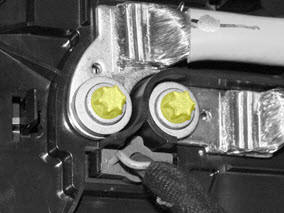
- Loosen the fasteners that secure the cables to the HV Battery
(torque 5 Nm).
Note: It is not necessary to fully
remove the fasteners.
.
- Remove the charger from the vehicle. Warning: The charger weighs approximately 85 pounds (40 kg).
- Remove the nuts and washers (x2) that secure the HV cables to
the charger.
Caution: Do not drop the washers or nuts inside the charger.
.
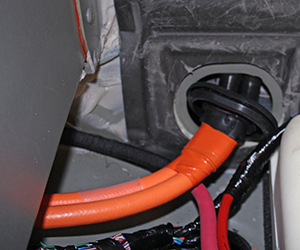
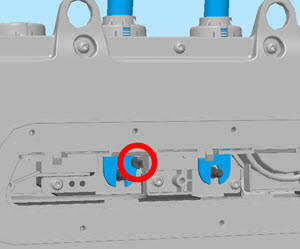
- Use a flathead screwdriver to release both HV inlet seals from
the tabs on the charger inlets.
.

- Pull the both HV cables out from the top of the charger.
Note: The rear HV cable has a slotted lug
that surrounds a tab in the charger; use a suitable
tool to pry the lug inboard to maneuver it around
the tab before completly removing the cable out from
the charger.
.
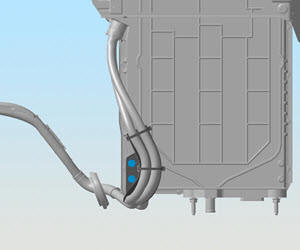
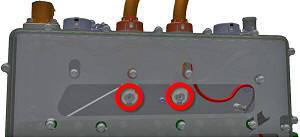
- Transfer the upper HV cables to the new charger.
Warning: It is possible to install the upper HV cables in the wrong positions when they are transferred to the new charger. Install the cables on the new charger as shown.
.

- Install new nuts and washers (x2) to secure the HV cables to the new charger (torque 5 Nm).
- Transfer the bracket to the back of the new charger (torque 5 Nm).
- Transfer the foam seal from the bottom of the charger to the new charger.