Tesla Model X: DCDC Converter (Remove and Replace)
Warning: Only technicians who have been trained in High Voltage Awareness are permitted to perform this procedure. Proper personal protective equipment (PPE) and insulating HV gloves with a minimum rating of class 00 (500V) must be worn any time a high voltage cable is handled. Refer to Tech Note TN-15-92-003, "High Voltage Awareness Care Points" for additional safety information.
Removal
- Remove the HV battery (refer to procedure).
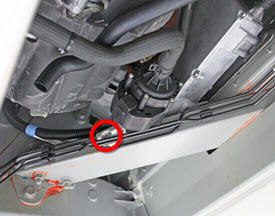
- Remove the screw that secures the coolant pump bracket to the
vehicle chassis (torque 5.5 Nm).
.
- Clamp the top coolant hose between the DCDC converter and the
coolant pump.
Note: Place suitable absorbent material around the affected area to absorb any possible fluid spillage.
.
- Release the locking ring that secures the upper coolant hose to the DCDC converter. Release the hose from the nipple.
- Move the coolant pump and hoses towards the front of the vehicle, out of the working area. Note: If the HVAC drain hose is moved out of the working area, ensure that it is moved back to the proper position during installation.
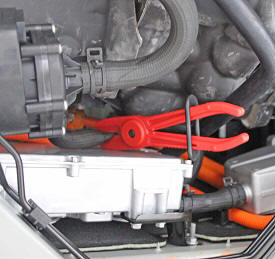
- Remove the bolt that secures the 12V positive cable to the RH
side of the DCDC converter (torque 12.5 Nm).
Note: Components have been removed in this graphic to aid clarity.
.
- Disconnect the 12V logic connector from the RH side of the DCDC converter.
- Remove the nut that secures both grounds to the stud on the
bulkhead (torque 9 Nm).
Note: The DCDC converter is removed from
the vehicle with both ground cables still attached.
.

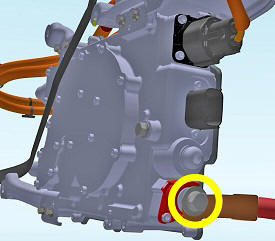
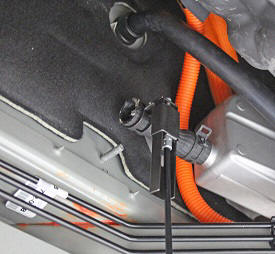
- Disconnect the HV harness connector from the RH side of the DCDC converter.
- Release the barrel clip that secures the HV cable to the stud on
the bulkhead.
.
.jpg)
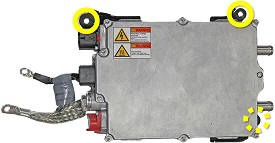
- Remove the nuts (x3) that secure the DCDC converter bracket to the bullkhead (torque 6 Nm).
Note: Components have been removed in this graphic
to aid clarity. .
- Pull the DCDC converter bracket away from the studs on the bulkhead. Tip: If necessary, use a trim tool to pry the DCDC converter bracket away from the bulkhead.
- Release the locking ring that secures the lower coolant hose on
the DCDC converter. Release the hose from the nipple.
.
- Remove the DCDC converter from the vehicle.
Installation procedure is the reverse of removal, except for the following:
- Ensure that the coolant hoses are not kinked.
- Perform a push-pull test on all connectors.
- Refill and bleed the cooling system (refer to procedure).