Tesla Model X: Four Wheel Alignment - Check and Adjust
Note: This procedure is not specific to a particular alignment machine. Follow the alignment equipment manufacturer's instructions for additional information and safety instructions.
Special tool(s) required for this procedure:
| Supplier | Part Number | Description |
| Tesla | 1054170-00-A | Alignment Torque Tools Kit |
| Tesla | 1079459-00-A | 22 mm Crow Foot Wrench |
- Perform a four wheel alignment check (refer to procedure).
Note: Follow the alignment equipment manufacturer's instructions when performing the following 4 steps.
Caution: Only fully tighten suspension nuts and bolts when the vehicle is on a 4-post lift and the suspension is in the ride height position.
Note: If available, use the Alignment Torque Tools Kit when performing the following 4 steps.
Note: Refer to the Wheel Alignment section of this manual for the latest alignment specifications.
Caution: The following 4 steps must be completed in the order shown.
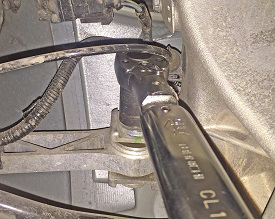
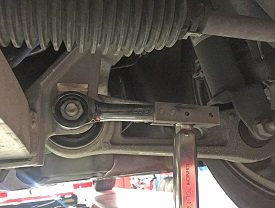
- Adjust the rear toe as required:
- Remove the mid aero shield (refer to procedure).
- Attach a 19 mm, 1/2 in. drive socket and Tohnichi ratchet
head to the Tohnichi torque wrench handle.
 Caution: If a socket wrench with an extension is
used to adjust rear toe, the extension might contact the
suspension height sensor bracket, causing the bracket to
bend. A bent bracket causes incorrect vehicle ride
height at the affected corner.
Caution: If a socket wrench with an extension is
used to adjust rear toe, the extension might contact the
suspension height sensor bracket, causing the bracket to
bend. A bent bracket causes incorrect vehicle ride
height at the affected corner.
- Set the torque wrench to 80 Nm.
- Adjust the rear toe as necessary.
- Air suspension only: In Toolbox, select Cycle Heights High --> Normal. Ensure that the toe is still within specification.
- Air suspension only: In Toolbox, refer to the Ride Height panel. If any value is more than +4 or less than -4, select Cycle Heights High --> Normal again.
- Reinstall the mid aero shield.
- Adjust the front camber as required:
- Attach the 22 mm custom ratcheting wrench to the Tohnichi
torque wrench handle.
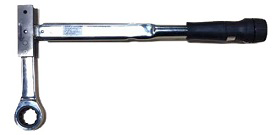
- Set the Tohnichi torque wrench to 140 Nm. Caution: If the alignment torque tools are not available, set a standard torque wrench to 130 Nm.
- Adjust the front camber as necessary.
Note: It is not necessary to remove the front aeroshield if the alignment torque tools are used to perform this step.
- Attach the 22 mm custom ratcheting wrench to the Tohnichi
torque wrench handle.
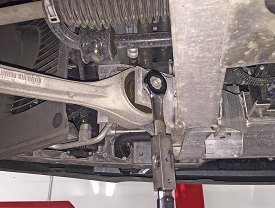
- Adjust the front caster as required:
- Attach the 22 mm custom ratcheting wrench to the Tohnichi
torque wrench handle.

- Set the Tohnichi torque wrench to 101 Nm. Caution: If the alignment torque tools are not available, set a standard torque wrench to 130 Nm.
- Perform a caster sweep.
- Adjust the front caster as necessary.
Note: It is not necessary to remove the front aeroshield if the alignment torque tools are used to perform this step.
- Attach the 22 mm custom ratcheting wrench to the Tohnichi
torque wrench handle.
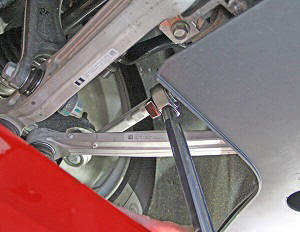
- Adjust the front toe as required:
- Attach the crow foot wrench to a torque wrench, inline with
the wrench handle.

- Set the torque wrench to 62 Nm.
- Adjust the front toe as necessary.
Note: It is not necessary to remove the front aeroshield if the alignment torque tools are used to perform this step.
- Attach the crow foot wrench to a torque wrench, inline with
the wrench handle.
Coil suspension only: If the vehicle cannot be aligned to specification, check the ride height and compare to the specifications at: General Information > Technical Data > Wheel Alignment. If the ride height is out of specification, inspect the suspension for damaged components.
- Check the steering wheel angle displayed on the touchscreen. If it is not 0.0 degrees, turn the steering wheel so that the steering wheel angle is 0.0 degrees.
- Readjust front toe if turning the steering wheel caused it to be out of specification.
- Air suspension only: In Toolbox, select Cycle Heights High --> Normal. Ensure that the toe is still within specification.
- Air suspension only: In Toolbox, refer to the Ride Height panel. If any value is more than +4 or less than -4, select Cycle Heights High --> Normal again.
- Check the alignment machine to ensure that all alignment parameters are still within specification.
- Transfer the PDF of the alignment results from the alignment machine and attach it to the repair order.
- Remove the brake pedal depressor.
- Reinstall all slip plate pins and turn plate pins. Tip: Install the forward slip plate pins before installing the rearward slip plate pins.
- Remove all 4 alignment optical targets.
- In Toolbox, run the ESP Steering Angle Sensor Calibration.
- Disconnect the laptop from the vehicle.
- Enter the vehicle.
- Press the brake pedal and shift into Park.
- Remove the wheel chocks.
- Remove the vehicle from the alignment rack.
- Test drive the vehicle.