Tesla Model X: Media Control Unit - Touch Screen (Remove and Install)
Warning: If the 12V power supply is disconnected, do not attempt to open the front doors with door glass in closed position. Failure to follow this instruction could result in door glass shatter.
Note: Before disconnecting the 12V power supply, ensure that the driver's door window is fully open. Failure to follow this instruction could result in vehicle lockout.
Special tool required for this procedure:
| Supplier | Part Number | Description |
| Tesla | 1065660-00-A | ESD FOAM CONTAINER FOR MEDIA CONTROL UNIT |
- Open both front doors and windows.
- Move the steering wheel fully downwards and away from the instrument panel.
- Open the glove box.
- Disconnect 12V power (refer to procedure).
- Remove the RH instrument panel finisher (refer to procedure).
- Remove the driver's inner face vent (refer to procedure).
- Remove the ground strap from the top of the MCU/touch screen.
- Remove the screws (x4) that secure the touch screen to the IP
carrier (torque 7 Nm).
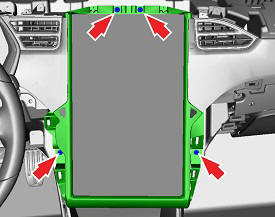
- Gently tilt the top of the MCU/touch screen, then disconnect the
Bluetooth and Wi-Fi harness connectors.
Caution: To prevent damage, ensure there is sufficient slack in the USB1 and USB2 wires. Excessive tension on these wires could damage the connector bodies on the MCU/touch screen.
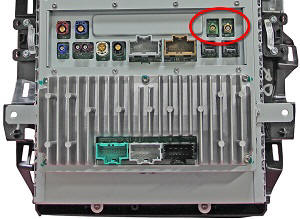
- Disconnect the USB1 and USB2 harness connectors.
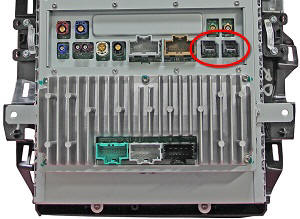
- Disconnect the remaining harness connectors. Caution: To prevent damage, make sure that the cables are aligned correctly with no excessive twists or bends.
- Remove the MCU/touch screen from the vehicle. Gently place the MCU/touch screen on the foam ESD container with the touchscreen facing down. Caution: Take care not to damage component(s).
Installation procedure is the reverse of removal, except for the following:
Caution: Do not install used MCU/touch screens that have not been remanufactured for diagnostic purposes. Installing a used, non-remanufactured MCU/touch screen might result in corrupted odometer readings.
- Reinstalling the top pad requires two technicians: One technician presses down on the LH side of the top pad to secure the LH clips while the other technician presses down on the RH side to secure the RH clips. Work from the outer edges of the top pad inward and secure all clips.