Tesla Model X Owners & Service Manuals

Tesla Model X: Panel - Aero Shield - Front (Remove and Replace)

Tesla Model X 2015-2023 Service Manual / Exterior Fittings / Panel - Aero Shield - Front (Remove and Replace)

Warning: "Jack mode" must be activated on vehicles with air suspension before lifting the vehicle. Failure to do this might lead to suspension damage and could cause serious personal injury.

Note: Vehicles with air suspension might need the suspension to be set to "High" or "Very High" to allow the vehicle to be positioned and supported correctly on a vehicle lift.

Removal

  1. Raise and support the vehicle (refer to procedure).

Warning: Do not work on an incorrectly supported vehicle.

  1. Remove the push clips (x11) that secure the front aero shield to the chin spoiler and subframe.

    Panel - Aero Shield - Front (Remove and Replace)

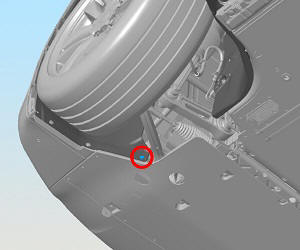
  2. On both sides of the vehicle, remove the push clip that secures the front aero shield to the wheel arch liner.

    Panel - Aero Shield - Front (Remove and Replace)

  3. Remove the bolts (x2) that secure the front aero shield to the front end module (torque 3 Nm).

    Panel - Aero Shield - Front (Remove and Replace)

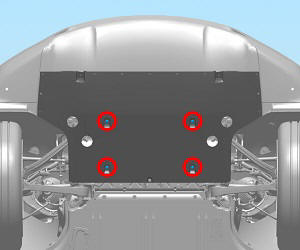
  4. Remove the bolts (x4) that secure the front aero shield to the body (torque 3 Nm).

    Panel - Aero Shield - Front (Remove and Replace)

  5. Remove the push clip that secures the aero shield to the body.

    Panel - Aero Shield - Front (Remove and Replace)

  6. Remove the front aero shield from the vehicle.
Installation

Installation procedure is the reverse of removal.

    READ NEXT:

     Panel - Aero Shield - Mid (Remove and Replace)

    Warning: "Jack mode" must be activated on vehicles with air suspension before lifting the vehicle. Failure to do this might lead to suspension damage and could cause serious personal injur

     Diffuser Panel - Rear (Remove and Replace)

    Removal Remove both reflex lamps (refer to procedure). On each side of the diffuser, release the parking sensors (x2) from the brackets on the diffuser.

     Nose Badge - Front (Remove and Replace)

    Remove Remove the front underhood apron (refer to procedure). Remove the bolts (x2) that secure the front nose badge to the front ducting (torque 5 Nm).

    SEE MORE:

     HV Battery Coolant - Drain

    Special tools required for this procedure: Caution: Only use these tools to perform the procedure. Supplier Part Number Description Tesla 1057671-00-A BATTERY COOLANT DRAIN TOOL

     Air Spring Module - Front - LH (Remove and Replace)

    Removal Place the vehicle on a lift, but do not raise the vehicle at this time. Activate Jack Mode on the touchscreen (refer to procedure). Remove the HEPA filter housing (refer to procedure). Connect a laptop with Toolbox to the vehicle. Use Toolbox to depressurize

    © 2019-2023 Copyright www.teslamx.net