Tesla Model X: Track - Inner - 2nd Row Seat - LH (Remove and Replace)
Tesla Model X 2015-2026 Service Manual / Seats / Track - Inner - 2nd Row Seat - LH (Remove and Replace)
Special tools required for this procedure:
| Supplier | Part Number | Description |
| Tesla | 1054190-00-A | Feeler Gauges |
| Tesla | 1085692-00-A | MX 2nd Row Seat Track Removal Kit |
- Remove the sliding carpet assembly (refer to procedure).
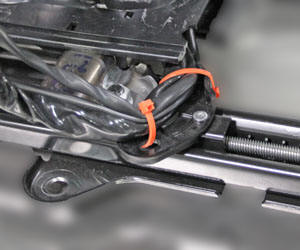
- Remove the cable ties that secure the harnesses to the track.
Note: Ensure that new cable ties are installed in the same locations during reinstallation.
- Remove the nuts that secure the outer track to the seat (torque 30 Nm).
- Remove the track from the vehicle.
- Combine the 6 mm and 5.5 mm feeler gauges to create an 11.5 mm
gauge. Insert the gauge against the stop at the rear of the new
inner track.
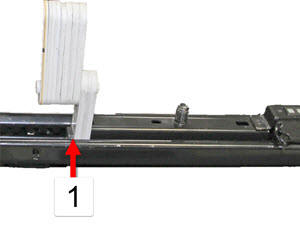
1 11.5 mm feeler gauge against stop at rear of track - Insert the square bit into the driveshaft hole in the new track, then install the bit into a drill.
- Use the drill to move the gearbox rearward until it contacts the feeler gauge.
- Remove the square bit from the gearbox, but leave it inserted in the drill.
- Insert the 11.5 mm feeler gauge against the stop at the rear of the out track.
- Insert the square bit into the driveshaft hole in the seat motor.
- Use the drill to spin the motor so that the gearbox on the outer track moves rearward until it contacts the feeler gauge.
- Loosely install the nuts that secure the inner track to the seat, but do not fully torque them at this time.
Note: The track is fully torqued after the seat is installed in a later step.
- Use cable ties to secure the harnesses to the plastic bracket on the track.
- Reinstall the sliding carpet assembly (refer to procedure).