Tesla Model X: ABS Modulator Assembly (Remove and Replace)
Tesla Model X 2015-2026 Service Manual / Brakes / ABS Modulator Assembly (Remove and Replace)
Removal
- Position the vehicle on a lift but do not lift it at this time.
- Recover refrigerant from the vehicle (refer to procedure).
- Remove the HEPA filter duct (refer to procedure).
- Disconnect 12V power (refer to procedure).
- Move the coolant reservoir out of the working area:
- Ensure that the reservoir cap is fully secured.
- Release the 12V harness clip from the coolant reservoir.
.jpg)
- Disconnect the coolant fluid level sensor electrical
connector.
.jpg)
- Remove the bolts (x4) that secure the coolant reservoir to
the front crossmember (torque 6 Nm).
.jpg)
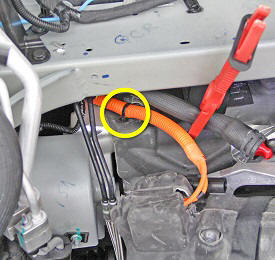
- Clamp the coolant hose at the rear of the coolant reservoir.
.jpg)
- Release the locking ring that secures the hose to the coolant reservoir. Release the coolant hose from the nipple on the reservoir.
- Plug the coolant hole then carefully move the reservoir to
the LH side of the frunk.
.jpg)
- Disconnect the electrical connector from the A/C compressor and
the electrical connector from the high pressure pipe.
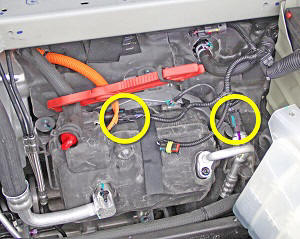
- Release the edge clip that secures the 12V harness to the compressor bracket.
- Remove the screw that secures the ground strap to the compressor
bracket (torque 8 Nm).
.jpg)
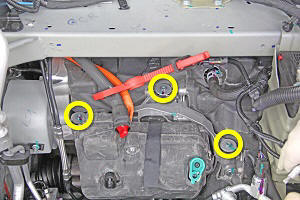
- Release the nuts (x2) that secure the A/C lines to the
compressor (torque 10 Nm).
.jpg)
- Have an assistant support the compressor. Release the bolts (x3)
that secure the A/C compressor bracket to the front drive unit
(torque 10 Nm).
- Release the push clip that secures the A/C compressor HV cable
to the body of the vehicle.
- Carefully move the A/C compressor to the RH side of the frunk.
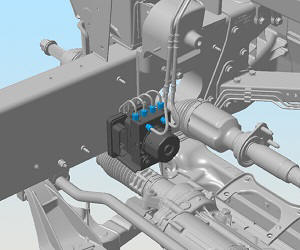
- Disconnect the ABS modulator electrical connector.
Note: Components have been removed in this graphic
to aid clarity.
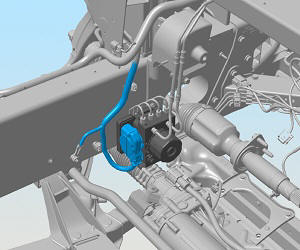
- Use a flare wrench to release the brake pipes (x6) from the ABS
modulator (torque 23 Nm).
Caution: Plug pipe connections to prevent ingress of moisture or dirt.
Note: Place suitable absorbent material around the affected area to absorb any possible fluid spillage.
Note: Components have been removed in this graphic to aid clarity.
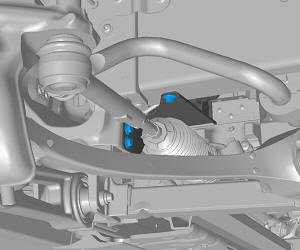
- Raise and support the vehicle (refer to procedure).
- Remove the bolts (x3) that secure the ABS modulator bracket to
the body of the vehicle (torque 5 Nm).
Note: Components have been removed in this graphic to aid clarity.
- Lower the vehicle.
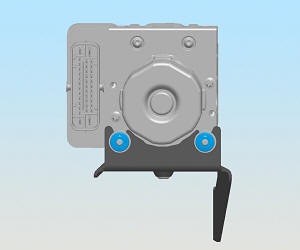
- Remove the ABS modulator and mounting bracket from the vehicle.
- Remove the nuts that secure the ABS modulator to the bracket
(torque 8 Nm). Release the ABS modulator from the bracket.
Note: Components have been removed in this graphic to aid clarity.
Installation procedure is the reverse of removal, except for the following:
- Bleed the brakes (refer to procedure).
- Recharge the A/C system.
-
Use Toolbox to update or redeploy the firmware:
- If the vehicle is not running the latest firmware, run the "Vehicle Firmware Update" procedure.
- If the vehicle is running the latest firmware, run the "Firmware Redeploy" procedure.
- Perform the "Stability Control (ESP) Program" procedure:
- Select Views > Chassis > Stability Control (ESP) Program
- Follow the onscreen instructions.
- Click the Start/Play button.