Tesla Model X: Applique - Liftgate (Remove and Replace)
Tesla Model X 2015-2026 Service Manual / Exterior Fittings / Applique - Liftgate (Remove and Replace)
Special tool required for this procedure:
| Supplier | Part Number | Description |
| Tesla | 1049517-00-A | Ergonomic Silicone Seam Roller |
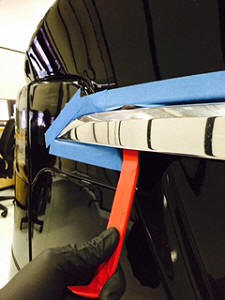
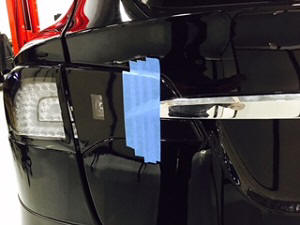
- Apply protective tape around the perimeter of the applique.
Caution: Protective tape prevents the exterior paint surfaces from being damaged.
-
Using a trim stick or other suitable tool,
carefully and evenly release the clips (x6) that secure the applique
to the liftgate.
Caution: Take care not to damage component(s).
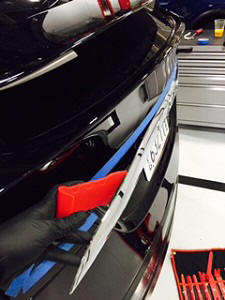
- Remove the liftgate applique from the vehicle.
- Remove the protective tape.
-
If reinstalling the original applique:
- Remove the double-sided tape.
- Clean the inside of the applique with an alcohol wipe and allow it to dry completely.
- Apply new double-sided tape to the applique.
- Remove the backing from the double-sided tape.
-
Install the 2 center clips that secure the
applique to the liftgate.
Note: Components have been removed in this graphic to aid clarity.
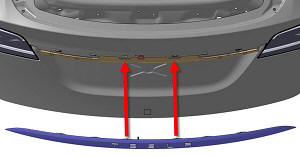
Tip: Use the locator post to correctly align the applique to the liftgate.
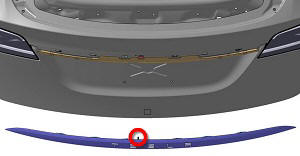
- Working outwards from the center of the applique, install the remaining 4 clips that secure the applique to the liftgate.
- Working outwards from the center of the applique, press firmly on the applique using a silicone seam roller to completely seal the double-sided tape.
-
Temporarily apply tape to both ends of the
applique to apply pressure.
- Wait at least 5 minutes before removing the tape.
Caution: Failure to wait at least 5 minutes before removing the tape can result in improper adhesion of the double-sided tape.