Tesla Model X: Applique - Roof - Rear (Remove and Replace)
Tesla Model X 2015-2026 Service Manual / Exterior Fittings / Applique - Roof - Rear (Remove and Replace)
Removal
- Open the liftgate and both rear doors.
- Apply protective tape on the areas surrounding the rear roof applique to prevent damage.
- Release the front and rear seals from the rear roof applique.
Note: Components have been removed in this graphic to aid clarity.
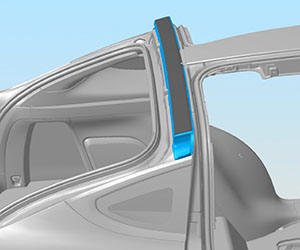
- Starting from one corner of the rear roof applique, use a cutting blade to cut through the sealant until the applique is loose. Caution: Do not damage the harnesses near the liftgate.
- Working from one corner to another, carefully lift the applique and remove it from the vehicle.
Caution: Do not damage the liftgate glass.
Tip: It might be easier to remove the applique while the liftgate is closed.
Installation- Ensure that the new rear roof applique comes with front and rear seals already installed. If the new rear roof applique does not come with front and rear seals already installed, transfer the seals from the old rear roof applique.
- Use the adhesive scraper to remove the excess adhesive from the liftgate.
- Use a vacuum to remove any loose remaining material.
- Remove the protective tape from the body of the vehicle.
- Clean the remaining adhesive on the liftgate with alcohol wipes. Allow the alcohol to dry fully before continuing to the next step.
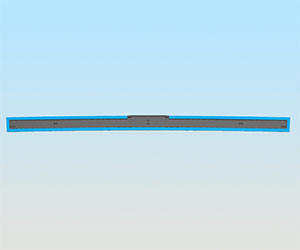
- Apply double sided tape to the applique.
- Apply primer to the applique, as directed by the adhesive manufacturer. Warning: Check the expiration date of the primer and adhesive before use. Note: Check the primer and adhesive packaging for the appropriate working times for each product. Prepare the necessary tools and work environment so that the the applique can be installed within the specified working times. Note: Check the primer packaging for the appropriate wait time before applying adhesive.
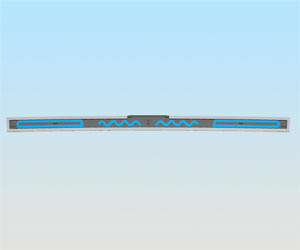
- Apply sealant on the rear roof applique, following the same path
as on the original part.
- Working from one end to the other, install the rear roof applique, making sure that the gaps are even front to back and side to side. Apply firm and even pressure along the entirety of the rear roof applique. Note: Ensure that all clips are properly seated. Caution: Replace any broken clips. Tip: Tape can be used to apply constant pressure to the rear roof applique.
- Clean off any excess adhesive that was extruded.
- Close the rear doors.
- Allow the adhesive to dry, as directed by the adhesive manufacturer.
Warning: Do not drive the vehicle until the adhesive has cured. Refer to the adhesive packaging for the safe drive-away time.