Tesla Model X: Battery Chiller (Remove and Replace)
Tesla Model X 2015-2026 Service Manual / Thermal Management / Battery Chiller (Remove and Replace)
Removal
- Remove the EXV valve (refer to procedure).
- Clamp both coolant hoses that are coming from the battery
chiller.
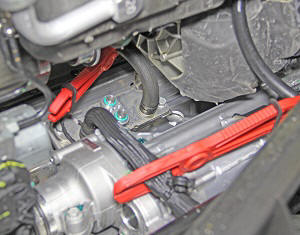
- Release the locking rings that secure the coolant hoses to the battery chiller. Release both coolant hoses from the nipples on the battery chiller. Note: Note installed position of components before removal. Note: Place suitable absorbent material around the affected area to absorb any possible fluid spillage.
- Place caps over the nipples on the battery chiller. Caution: Plug pipe connections to prevent ingress of moisture or dirt.
- Plug both coolant hoses. Caution: Plug the line connections to prevent ingress of moisture or dirt.
- Remove the bolts (x2) that secure the battery chiller to the
vehicle (torque 12 Nm).
Note: Note installed position of
components before removal.

- Remove the battery chiller from the vehicle.
Installation procedure is the reverse of removal, except for the following:
Note: Inspect the O-rings. Replace as necessary.
- Ensure that the coolant hoses are routed under the sway bar when installed.
- Ensure that the arrow on the top of the battery chiller points towards the rear of the vehicle when installed.