Tesla Model X: Handle and Cable Assembly - 40A Wall Connector (Replace)
Tesla Model X 2015-2024 Service Manual / External Charging Connectors / Handle and Cable Assembly - 40A Wall Connector (Remove and Replace) / Handle and Cable Assembly - 40A Wall Connector (Replace)
Installation
- Insert the cable assembly through the grommet on the bottom of the Wall Connector. Caution: Do not unseat the grommet when inserting the cable assembly.
- Slide a new pinch clamp over the wires to the end of the cable jacket.
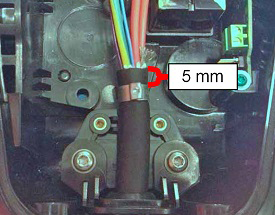
- Use a clamp pincer to install the pinch clamp approximately 5 mm
from the end of the cable jacket.
- Loosely install the screws (x2) that secure the plastic clamp to the casing. Note: Do not torque the screws yet.
- Gently pull the cable jacket towards the bottom of the Wall
Connector until the pinch clamp is flush with the plastic clamp.
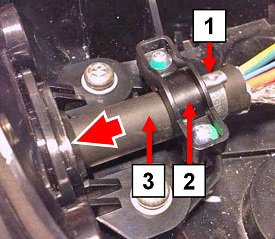
1 Pinch clamp 2 Plastic clamp 3 Cable jacket - Fully tighten the screws (x2) that secure the plastic clamp to the casing (torque 3.4 Nm).
- Connect the wires in the same order as removal (steps 5-7 in the "Removal" section). Caution: The ferrules on the ends of the L1 and L2 wires are one-time-use only. The ferrules or the handle and cable assembly must be replaced if they have been previously installed.
- Connect the white ribbon cable and reinstall the front cover of the Wall Connector.
- Reinstall the screws (x2) that secure the cover of the Wall Connector to the casing (torque 1.1 Nm).
- Turn on the electricity at the circuit breaker.
- Check the front diagnostic lights on the Wall Connector cover. When it is not plugged into the vehicle, the topmost green LED should be steady (not flashing).
- Charge the vehicle with the Wall Connector for 2-3 minutes to verify proper operation of the Wall Connector.