Tesla Model X: Pipe - High Pressure - Compressor to Condenser (Remove and Replace)
Tesla Model X 2015-2026 Service Manual / Thermal Management / Pipe - High Pressure - Compressor to Condenser (Remove and Replace)
Removal
- Remove the cooling fan module (refer to procedure).
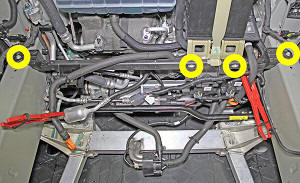
- Remove the bolts (x4) that secure the plastic support beam to
the body of the vehicle (torque 6.5 Nm).
Note: Do not attempt to remove the plastic support beam from the vehicle.
- Carefully pull the plastic support beam forward to gain access to the compressor-to-condenser high pressure pipe.
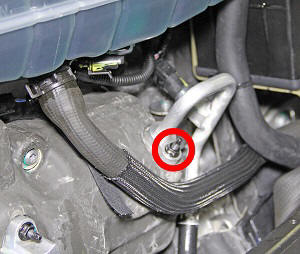
- Remove the nut that secures the compressor-to-condenser high
pressure pipe to the compressor (torque 10 Nm).
- Disconnect the pressure sensor electrical connector.

- Remove the compressor-to-condenser high pressure pipe from the
vehicle.

Installation procedure is the reverse of removal, except for the following:
Note: Inspect the O-rings. Replace as necessary.
Caution: Lubricate new O-rings with clean refrigerant oil. Recharge the refrigerant.