Tesla Model X: Radiator (Remove and Replace)
Removal
Remove the cooling fan module assembly (refer to procedure).
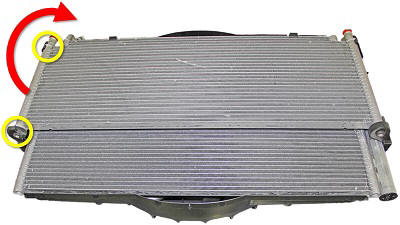
Place the cooling fan module on a flat, clean surface with the
radiator facing up.
Release the RH side of the radiator from the open-ended
retaining clips on the condenser fan shroud bracket. Pivot the
radiator towards the LH side of the condenser.
Release the radiator from the condenser fan shroud bracket and
lift it up off of the condenser.
Installation
Installation procedure is the reverse of removal.
READ NEXT:
Removal
Remove the HEPA filter duct (refer to procedure).
Lift up the front of the cowl panel and release the drain hose.
Move the drain hose away fr
Removal
Remove the cooling fan module (refer to procedure).
Remove the battery cage (refer to procedure).
Remove the bolts (x4) that secure the 3-way and 4-way valves to
the plast
Removal
Remove the cooling fan module (refer to procedure).
Remove the battery cage (refer to procedure).
Remove the bolts (x4) that secure the 3-way and 4-way valves to
the plast
SEE MORE:
Touch Controls > Pedals & Steering > Acceleration to
choose a preferred acceleration mode:
Chill limits acceleration for a slightly smoother and
gentler ride.
NOTE: When Chill is selected, Chill displays on the
instrument panel, above the driving speed.
Sport provides the norm
How It Works
The traction control system constantly monitors the
speed of the front and rear wheels. If Model X
experiences a loss of traction, the system minimizes
wheel spin by controlling brake pressure and motor
power. By default, the traction control system is on.
Under normal conditions,