Tesla Model X: Seat Assembly - 2nd Row - LH (With Broken Seat Track Motor) (Remove)
Caution: Only perform this procedure if the seat is unable to move backward and forward in order to allow access to all fasteners that secure the seat.. If the seat is able to fully move, refer to Seat Assembly - 2nd Row - LH (Remove and Install).
This procedure requires drilling through the gearbox housing to access the gear in the outer track, inserting a square drill bit though the gear and into the motor, and using a drill to spin the motor. This causes the seats to move, which provides access to the fasteners that secure the seat. This procedure requires replacing the outer track.
Special tools required for this procedure:
| Supplier | Part Number | Description |
| Tesla | 1085692-00-A | MX 2nd Row Seat Track Removal Kit |
| Tesla | 1086947-00-A | 90 Degree Pneumatic Drill |
Removal
- Remove the 2nd row middle floor panel (refer to procedure).
- Connect a laptop with Toolbox to the vehicle.
- On the touchscreen, select Factory Mode > Seat Install Mode.
- Move the center seat completely forward.
- Remove the outboard and inboard podium trim panels from the seat
base.
Caution: Replace any broken clips.
- Using a pick or similar tool, remove the carpet at the base of
the LH seat to access the fasteners that secure the front sliding
panel.
Caution: This part is a one-time use component.
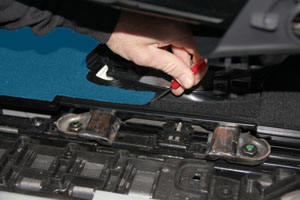
- Release the screws (x2) that secure the front sliding panel to
the seat tracks (torque 2.5 Nm).
- Release the front sliding panel from the seat tracks.
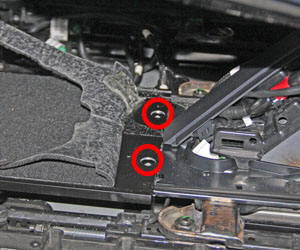
- Release the fasteners that secure the LH outboard support
bracket (torque 2.5 Nm).
- Remove the rocker duct and the C-Pillar feeder duct together as
an assembly.
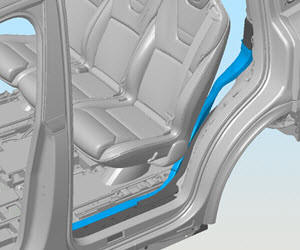
- Release the clip that secures the coolant hose. Carefully move the coolant hose outboard to provide better access to the base of the seat.
- Install the drill stop collar onto the 5/16 in (8 mm) drill bit. Adjust the bit length to 15.5 mm.
- Install the drill bit with the collar into the 90 degree pneumatic drill.
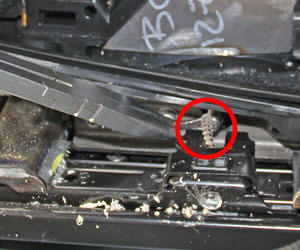
- Make a drill mark in the center of the gearbox housing.
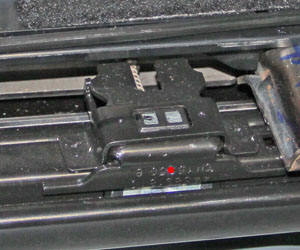
- Drill through the gearbox housing to expose the gear, but do not
drill through the gear at this time. If necessary, expand the hole
so that the entire gear is visible.
Warning: To avoid personal injury, eye protection must be worn when performing this operation.
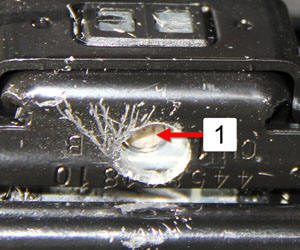
1 Gear - Install the 3/16 in (9.5 mm) drill bit into the 90-degree pneumatic drill.
- Slowly drill through the gear to expose the driveshaft.
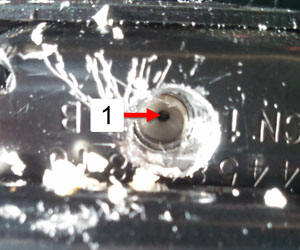
1 Driveshaft exposed - Working from above the track, use pliers to remove the
driveshaft. Discard the driveshaft; ensure that a new driveshaft is
installed during reinstallation.
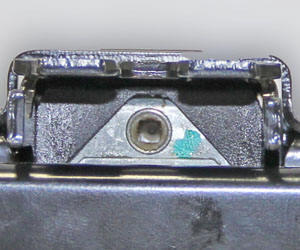
Inboard view of gearbox
- Using short bursts, carefully drill through the hole for the
motor shaft to expose the square hole on the inboard of the gear.
Caution: When drilling, drill only small amounts at a time to avoid damaging the square hole. If the square hole is damaged, the seat must be cut out of the vehicle.

1 Square hole in gear - Insert the square bit through the hole in the gearbox and into
the motor.

- With the square bit still in place, position the drill at the end of the bit and tighten the chuck.
- Using the drill, ensure that the seat can be moved forward and backward. Note: If the seat does not move, the bit is not fully inserted into the motor.
- Using the drill, move the seat fully forward.
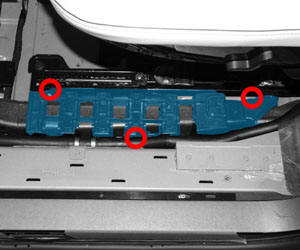
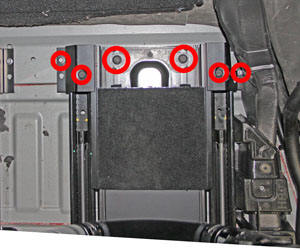
- Remove the bolts (x6) that secure the rear of the seat tracks.
- Using the drill, move the seat fully backward.
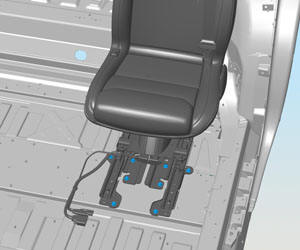
- Remove and discard the bolts (x8) that secure the front of the
seat tracks.
- Disconnect 12V power (refer to procedure).
- Release the clip that secures the harnesses to the bracket in
front of the seat.
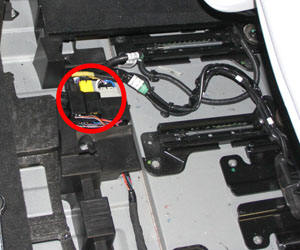
- Working from the bottom of the harness block, use a pick or
similar tool to release the locking tabs to disconnect the small
yellow and gray harnesseses.
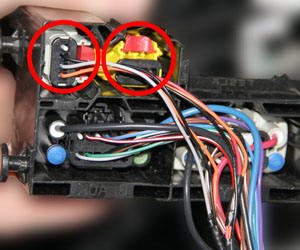
- Working from the top of the harness block, disconnect the large black harness.
- Prepare a padded surface for the seat when it is removed in the next step.
- With an assistant, carefully remove the seat from the vehicle and place it on the padded surface with the outboard side of the seat facing up.