Tesla Model X: Sensor - Ride Height - Rear - LH (Remove and Replace)
Warning: If the vehicle has air suspension, activate "Jack"
mode on the touchscreen before raising and supporting the vehicle.
Removal
- Remove the road wheel (refer to procedure).
- Disconnect the ride height sensor connector and harness.
- Remove the nut that secures the link to the upper suspension
link (torque 7 Nm).
Caution: To prevent ball joint damage, always hold the ball
joint pin with a wrench while loosening or tightening the
lock nut.
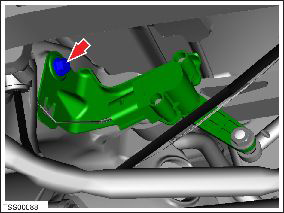
- Remove the bolt that secures the ride height sensor to the body
(torque 7 Nm).
- Remove the ride height sensor from the vehicle.
Installation
Installation procedure is the reverse of removal, except for the
following:
Note: Clean the affected areas before installation.
Caution: Replace all nylon-insert locknuts.
Calibrate the ride height sensors (refer to procedure).
READ NEXT:
Remove
Position the vehicle on a lift, but do not raise the vehicle at
this time.
Use the Toolbox "Air Suspension Fill/Deflate" panel to
depressurize the system.
Remove the cowl
Removal
Position the vehicle on a lift, but do not raise the vehicle at
this time.
Use the Toolbox "Air Suspension Fill/Deflate" panel to
depressurize the system.
Remove the H
Remove
Remove the ECU box from the vehicle (refer to procedure).
Release the screw (x2) that secures the bracket inside the ECU
box (torque 2.5 Nm).
SEE MORE:
Warning: Only technicians who have been trained in High
Voltage Awareness are permitted to perform this procedure. Proper
personal protective equipment (PPE) and insulating HV gloves with a
minimum rating of class 00 (500V) must be worn any time a high
voltage cable is handled. Refer
Since your Model X does not have traditional door
handles that you can pull from the outside, it is
equipped with pop actuators (sometimes referred to as
"ice breakers") that are used to assist in opening the
front doors in cases where resistance is detected, such
as ice buildup in cold weather