Tesla Model X: Vacuum Fill
- Ensure that the coolant reservoir adapter is securely installed, then connect the vacuum refill tool.
- Ensure that the coolant refill valve and the air inlet valve are
closed.
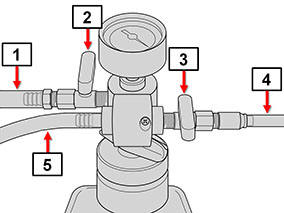
1 Coolant refill hose 2 Coolant refill valve 3 Air inlet valve 4 Shop air supply 5 Overflow hose - Connect shop air supply with a minimum pressure of 5.5 bar (80 PSI) to the vacuum refill tool.
- Place the end of the overflow hose in a suitable container to collect any coolant that is drawn out of the system when the vacuum is applied.
- Open the air inlet valve. Note: A hissing noise is normal.
- Allow the tool to evacuate the system until the needle on the vacuum gauge reaches the green range or the needle stops moving. Note: It is normal for some cooling hoses to collapse due to the vacuum in the system.
- Close the air inlet valve and monitor the gauge for approximately 30 seconds to verify that a vacuum is maintained in the cooling system. Note: If the gauge reading drops, there is a leak in the system that must be fixed before refilling with coolant.
- Position a container of coolant at, or as close as possible to, the height of the coolant reservoir. Note: Ensure that there is sufficient coolant to refill the entire system. In this manual, refer to General Information > Capacities, Fluids, and Lubricants > Fluid Capacities. Caution: Use the specified coolant only. In this manual, refer to General Information > Capacities, Fluids, and Lubricants > Fluids.
- Place the end of the coolant refill hose into the coolant container. Ensure that the end is fully submerged. Tip: If the container is especially deep, the end of the hose might float in the coolant. Use a weight, hanger, or other tool to keep the end of the hose submerged in the coolant.
- Very slowly open the coolant refill valve to allow coolant to be drawn into the coolant refill hose. Close the valve when the hose is full of coolant. This purges trapped air from the hose.
- Reopen the air inlet valve. Close the valve when the vacuum gauge needle stops rising.
- Slowly open the coolant refill valve to allow coolant to be drawn into the system. Caution: Ensure that the end of the coolant refill hose remains submerged to prevent air from being drawn into the system. Immediately close the coolant refill valve if air enters the coolant refill hose.
- Once the gauge stops moving, close the coolant refill valve.
- Remove the vacuum refill tool:
- Leave the coolant refill hose in the container.
- Lift the tool from the reservoir.
- Holding the tool above the container, open the coolant refill valve to drain the coolant from the refill hose into the container.
- Start the cooling system bleed procedure (refer to procedure). Tip: It is not necessary to run the complete (15 minute) bleed routine. The bleed routine can be stopped once the coolant level has stabilized.
- After the bleed procedure is complete, reinstall the front aeroshield.
Coolant System - Check and Fill
- Remove the HEPA filter duct (refer to procedure).
- Inspect the coolant level.
- If necessary, remove the cap from the reservoir and fill the reservoir to the correct level.