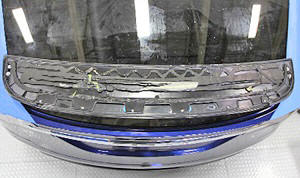
Tesla Model X: Applique - Active Spoiler (Remove and Replace)
Warning: To avoid personal injury, wear cut-resistant gloves when performing this operation.
Note: Use Dow Betaseal Express or an equivalent fast-curing adhesive to perform this procedure.
Removal
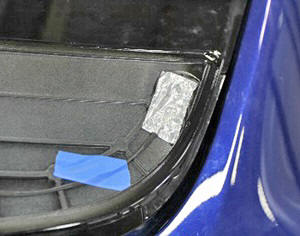
- Apply protective tape to the liftgate, at both ends of the active spoiler assembly.
- Use the touchscreen to move the active spoiler to the extended
position:
- Touch CONTROLS.
- Touch Settings.
- Touch Service & Reset.
- Slide the "Spoiler" bar to EXTENDED.
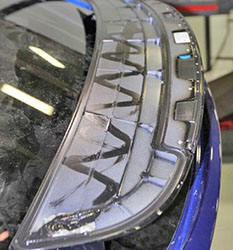
- Use a cutting wire with a T-handle to cut the sealant underneath
the active spoiler applique.
Caution: Take care not to snag the cutting wire between the active spoiler and the high mounted brake lamp.
Caution: Take care not to damage component(s).

- Remove the active spoiler applique from the active spoiler.
- Remove the protective tape from the liftgate.
- Ensure that the active spoiler is not damaged before installing the active spoiler applique. Replace the active spoiler if it is damaged.
- Clean off any excess adhesive from the top of the active spoiler.
- Use the touchscreen to move the active spoiler to the retracted
position:
- Touch CONTROLS.
- Touch Settings.
- Touch Service & Reset.
- Slide the "Spoiler" bar to AUTOMATIC.
- Clean the top of the active spoiler and the bottom of the active spoiler applique with alcohol.
- If necessary, cover the bolts on both ends of the active spoiler
with butyl patches.
- Apply primer to the top of the active spoiler and the bottom of
the active spoiler applique, as directed by the adhesive
manufacturer.
Warning: Check the expiration date of the primer and adhesive before use.
Note: Check the primer and adhesive packaging for the appropriate working times for each product. Prepare the necessary tools and work environment so that the the applique can be installed within the specified working times.
Note: Check the primer packaging for the appropriate wait time before applying adhesive.
- Apply adhesive to the top of the active spoiler.
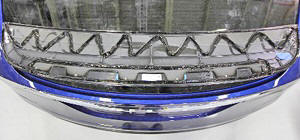
- Install the active spoiler applique on the active spoiler, making sure that the gaps between the active spoiler applique and the active spoiler are even front to back and side to side. Apply firm and even pressure along the entirety of the active spoiler applique.
- Clean the edges of the active spoiler and active spoiler applique with alcohol. Clean off any excess adhesive that was extruded.
- Allow the adhesive to dry, as directed by the adhesive manufacturer.
Warning: Do not drive the vehicle until the adhesive has cured. Refer to the adhesive packaging for the safe drive-away time.