Tesla Model X: Front Drive Unit (Remove and Replace)
Tesla Model X 2015-2026 Service Manual / Front Drive Unit / Front Drive Unit (Remove and Replace)
Special tool required for this procedure:
| Supplier | Part Number | Description |
| Tesla | 1071308-00-B | Small Drive Unit Sling |
Remove the front drive unit (refer to procedure).
Transfer Components
New drive units are shipped with temporary LH and RH mounts. Do not install these mounts in the vehicle. This section explains:
- How to transfer the acoustic padding, coolant hose, and LH mount from the old drive unit to the new one
- How to transfer the temporary LH and RH mounts from the new drive unit to the old one
- Drain the coolant from the old drive unit.
- Remove the coolant hose from the rear of the old drive unit.
Note: This hose will be installed onto the new
drive unit in a later step.

- Remove the LH motor mount from the old drive unit. Note: This mount will be installed onto the new drive unit in a later step.
- Move the transmission jack to the gantry area and secure the
black, red, and yellow sling mounts:
Note: The blue sling mount is not used in
this procedure.
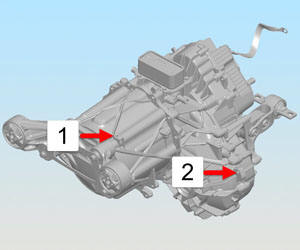
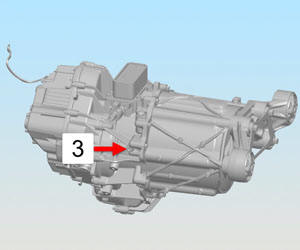
Note: When securing the yellow sling mount, use the hoist ring with the sleeve spacer.1 Black sling mount 2 Red sling mount 3 Yellow sling mount 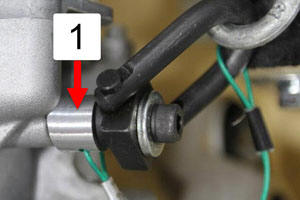
1 Sleeve spacer - Secure the sling tool to the gantry.
- Lift the drive unit off of the transmission jack.
- Remove the acoustic padding from the old drive unit. Note: This padding will be installed onto the new drive unit in a later step.
- Position the crate with the new drive unit underneath the gantry. Open the crate and set the lid so the padding faces upwards.
- Prepare another padded area next to the crate lid.
- Lower the old drive unit onto one of the padded surfaces.
- With the new drive unit still inside the create, remove the top bolt that secures the LH motor mount. Note: This allows the tilt-lift extension to be secured to the new drive unit without removing the LH mount.
- Secure the tilt-lift extension to the new drive unit. Lift it out of the crate and onto the other padded surface.
- Remove the LH mount from the new drive unit. Install it onto the old drive unit, but do not install the top bolt at this time.
- Remove the RH mount from the new drive unit. Install it onto the old drive unit.
- Secure the tilt-lift extension to the old drive unit. Lift the drive unit into the crate.
- Install the top bolt that secures the LH mount to the old drive unit.
- Secure the tilt-lift extension to the new drive unit. Lift the drive unit to a working height.
- Install the acoustic padding onto the new drive unit.
- Place the new drive unit on the transmission jack and secure it
with the strap.
Note: Have an assistant guide the drive unit so
that the ridge on the base of the drive unit fits into the
fitting on the transmission jack
- Release the tilt-lift extension.
- Install the coolant hose onto the new drive unit.
- Install the LH motor mount onto the new drive unit (torque 38 Nm).
Installation procedure is the reverse of removal, except for the following:
Inspect the drive unit seals. If any seal is damaged, replace it.
Perform a full firmware update.