Tesla Model X: A/C Refrigerant Leak Detection
Tesla Model X 2015-2026 Service Manual / Thermal Management / A/C Refrigerant Leak Detection
Dye Injection
Note: The steps in this section are for manually injecting dye in the compressor discharge port. The Robinair AC1234-7 machine can inject dye while the machine is connected to the vehicle. If using the AC1234-7 machine, recover refrigerant, then use the "UV Dye" option to inject dye before recharging refrigerant (refer to procedure).
- Recover refrigerant from the vehicle (refer to procedure).
- While the refrigerant is being recovered, remove the underhood storage unit (refer to procedure).
- Remove the fastener that secures the HVAC compressor discharge
line.
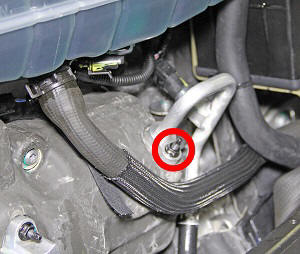
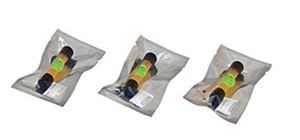
- Pour 1 container of Tracerline Tracer-Stick TP-3811 Hybrid / POE
ultraviolet leak detection dye into the A/C compressor discharge
port and reinstall the fastener to secure the discharge line to the
A/C compressor (torque 10 Nm).
- Recharge the vehicle with refrigerant (refer to procedure).
- On the touchscreen, set the temperature to LO on both the driver and passenger controls.
- Run the A/C system for 10 minutes to allow the dye to circulate.
- Using an ultraviolet (UV) or blue light lamp, examine all A/C lines for leaks. Note: Leaks glow a bright yellow-green. Note: If the vehicle is equipped with a rear HVAC assembly, examine the A/C lines that run along the RH rocker panel to the rear HVAC assembly.
- Once the leak is located, recover refrigerant from the vehicle (refer to procedure).
- Replace the defective component(s).
- Recharge the vehicle with refrigerant (refer to procedure). Caution: If a component was replaced, additional oil must be added to the system. See the end of the "Recover Refrigerant and Verify Charge" section for more information.
- Use a general-purpose cleaner to clean off all dye residue. This prevents leftover residue from being mistake for a leak in future repairs. Confirm that all residue is removed by inspecting all A/C lines with a UV or blue light lamp.
- Run the A/C system with the temperature set to LO. Inspect all A/C lines with a UV or blue light lamp to verify repairs.
- Fill out the Tracerline dye label and place it next to the A/C refrigerant label on the right underhood apron to inform future technicians that dye has been added to the A/C system.
- Reinstall all components that were removed for access.