Tesla Model X: Instrument Cluster (Remove and Replace)
Tesla Model X 2015-2026 Service Manual / Infotainment / Instrument Cluster (Remove and Replace)
Caution: Before beginning this procedure, prepare a protected surface to set instrument cluster on when it is removed, such as placing a fender cover, towel, or other soft material onto a workbench.
Caution: The screen on the instrument cluster is very easy to scratch. When handling the instrument cluster, only touch the metal frame that surrounds the screen. Do not touch the screen, even when wearing gloves. Removal
- Open the front LH door.
- Move the steering wheel fully downwards and away from the instrument panel.
- Disconnect 12V power (refer to procedure).
- Remove the driver's outer face level vent (refer to procedure).
- Remove the driver's inner face level vent (refer to procedure).
- Remove the screws (x4) that secure the instrument cluster to the
IP carrier (torque 2 Nm).
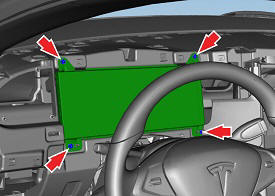
- Carefully release the instrument cluster from the IP carrier to access the harness connections. Caution: Do not touch the screen.
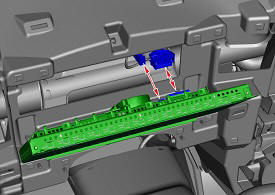
- Disconnect the electrical connectors (x2) from the rear of the
instrument cluster.
Caution: Protect the harnesses connectors from contamination and dirt ingress.
- Carefully remove the instrument cluster and place it onto a protected surface.
Installation procedure is the reverse of removal, except for the following: Use Toolbox to update or redeploy the firmware:
- If the vehicle is not running the latest firmware, run the "Vehicle Firmware Update" procedure.
- If the vehicle is running the latest firmware, run the "Firmware Redeploy" procedure.